<?xml version="1.0" encoding="utf-8"?><feed xmlns="http://www.w3.org/2005/Atom" ><generator uri="https://jekyllrb.com/" version="3.10.0">Jekyll</generator><link href="/feed.xml" rel="self" type="application/atom+xml" /><link href="/" rel="alternate" type="text/html" /><updated>2025-02-08T11:30:50+00:00</updated><id>/feed.xml</id><title type="html">Graham Lyons</title><subtitle>Software Engineer</subtitle><entry><title type="html">A Zero-Fricton Terraform Primer</title><link href="/article/a-zero-fricton-terraform-primer" rel="alternate" type="text/html" title="A Zero-Fricton Terraform Primer" /><published>2018-06-04T00:00:00+00:00</published><updated>2018-06-04T00:00:00+00:00</updated><id>/article/terraform-intro</id><content type="html" xml:base="/article/a-zero-fricton-terraform-primer"><![CDATA[<p>What is Terraform and why should you care? How can you learn about it without having to provision real stuff in your Amazon account?</p>

<h2 id="infrastructure-as-code">Infrastructure as Code</h2>

<p>Back in the days when we started to get away from dealing with real servers in a rack somewhere a number of cloud infrastructure providers appeared, offering access to their virtual estate via a console and - if they were any good - an API.</p>

<p>I’ve worked in lots of different places which used these cloud providers (OK, mainly Amazon Web Services) and I’ve seen about as many different ways to manage the infrastructure.</p>

<p>The worst way is of course via the console. Clicking in a GUI is not a good way to make processes repeatable or scalable. Beyond that the options include: CloudFormation, a service from AWS (only works with AWS); HEAT templates from OpenStack, which is very similar to CloudFormation (only works with OpenStack); Chef Provisioning, which is no longer supported by Chef; and of course, Terraform.</p>

<p>All of these tools allow you to define what infrastructure you’d like - virtual machines, load balancers, block storage, databases etc. - as some kind of machine and human readable language (CloudFormation uses JSON, for example). The tool can interpret the code and create the desired resources; the code can be checked into version control and tracked like application code.</p>

<h2 id="terraform">Terraform</h2>

<p><a href="https://www.terraform.io/">Terraform</a> is an Infrastructure as Code tool from Hashicorp, who produce other popular pieces of software such as Vagrant. It uses a declarative language, Hashicorp Configuration Language (HCL), to define the desired state of your cloud infrastructure. From this code it generates a dependency graph of the resources and, when run against one or more providers, walks that graph and ensures that the resources exist and are configured as defined.</p>

<h2 id="installation">Installation</h2>

<p>The <code class="language-plaintext highlighter-rouge">terraform</code> executable is delivered as a single file so it just needs to be downloaded and put onto your system’s path. On a *nix system <code class="language-plaintext highlighter-rouge">/usr/local/bin/</code> is a good place as it’s often already on your <code class="language-plaintext highlighter-rouge">$PATH</code> environment variable. From https://www.terraform.io/ find the ‘Download’ link and select the most appropriate version for your system. Download it, unzip it and put the <code class="language-plaintext highlighter-rouge">terraform</code> file somewhere you can run it, for example <code class="language-plaintext highlighter-rouge">/usr/local/bin/</code>.</p>

<p>Check that it’s installed successfully and find out what version you’re running - mine is:</p>
<div class="language-shell highlighter-rouge"><div class="highlight"><pre class="highlight"><code><span class="nv">$ </span>terraform <span class="nt">--version</span>
Terraform v0.11.7
</code></pre></div></div>

<h2 id="defining-some-infrastructure">Defining Some Infrastructure</h2>

<p>Now that Terraform is installed, we need to define what infrastructure we want it to create. We use HCL to define resources for different providers. A simple one is the <a href="https://www.terraform.io/docs/providers/random/index.html">random provider</a>, which generates random data to use, for example, as server names. It doesn’t operate against a cloud provider and requires no API keys etc. so is good to illustrate Terraform’s workflow. We’ll also use the <a href="https://www.terraform.io/docs/providers/local/index.html">local provider</a> to write that random data out to a file.</p>

<p>Put the following into a file called <code class="language-plaintext highlighter-rouge">example.tf</code>:</p>
<div class="language-hcl highlighter-rouge"><div class="highlight"><pre class="highlight"><code><span class="nx">variable</span> <span class="s2">"name_length"</span> <span class="p">{</span>
  <span class="nx">type</span>    <span class="p">=</span> <span class="s2">"string"</span>
  <span class="nx">default</span> <span class="p">=</span> <span class="s2">"2"</span>
  <span class="nx">description</span> <span class="p">=</span> <span class="s2">"The number of words to put into the random name"</span>
<span class="p">}</span>

<span class="nx">resource</span> <span class="s2">"random_pet"</span> <span class="s2">"server"</span> <span class="p">{</span>
  <span class="nx">length</span> <span class="p">=</span> <span class="s2">"${var.name_length}"</span>
<span class="p">}</span>

<span class="nx">resource</span> <span class="s2">"local_file"</span> <span class="s2">"random"</span> <span class="p">{</span>                                                   
  <span class="nx">content</span>     <span class="p">=</span> <span class="s2">"${random_pet.server.id}"</span>                                        
  <span class="nx">filename</span> <span class="p">=</span> <span class="s2">"${path.module}/random.txt"</span>                                         
<span class="p">}</span>

<span class="nx">output</span> <span class="s2">"name"</span> <span class="p">{</span>
  <span class="nx">value</span> <span class="p">=</span> <span class="s2">"${random_pet.server.id}"</span>
<span class="p">}</span>
</code></pre></div></div>

<h3 id="aside-code-organisation"><em>Aside: Code Organisation</em></h3>

<p><em>Terraform will look in the directory you tell it to (the current directory by default) and find all of the <code class="language-plaintext highlighter-rouge">*.tf</code> files - sub-directories are ignored. It’ll treat the files it finds as one single definition and draw a graph of all the resources. It’s common to see the <code class="language-plaintext highlighter-rouge">variable</code>s and <code class="language-plaintext highlighter-rouge">output</code>s split into different files to make it clear where to find them. It’s also common, and a good idea, to split code into modules but we won’t worry about that today.</em></p>

<p>In the same directory run: <code class="language-plaintext highlighter-rouge">terraform init</code>. You should see output which looks a bit like this:</p>

<div class="language-shell highlighter-rouge"><div class="highlight"><pre class="highlight"><code><span class="nv">$ </span>terraform init

Initializing provider plugins...
- Checking <span class="k">for </span>available provider plugins on https://releases.hashicorp.com...
- Downloading plugin <span class="k">for </span>provider <span class="s2">"random"</span> <span class="o">(</span>1.3.1<span class="o">)</span>...
- Downloading plugin <span class="k">for </span>provider <span class="s2">"local"</span> <span class="o">(</span>1.1.0<span class="o">)</span>...

The following providers <span class="k">do </span>not have any version constraints <span class="k">in </span>configuration,
so the latest version was installed.

To prevent automatic upgrades to new major versions that may contain breaking
changes, it is recommended to add version <span class="o">=</span> <span class="s2">"..."</span> constraints to the
corresponding provider blocks <span class="k">in </span>configuration, with the constraint strings
suggested below.

<span class="k">*</span> provider.local: version <span class="o">=</span> <span class="s2">"~&gt; 1.1"</span>
<span class="k">*</span> provider.random: version <span class="o">=</span> <span class="s2">"~&gt; 1.3"</span>

Terraform has been successfully initialized!

You may now begin working with Terraform. Try running <span class="s2">"terraform plan"</span> to see
any changes that are required <span class="k">for </span>your infrastructure. All Terraform commands
should now work.

If you ever <span class="nb">set </span>or change modules or backend configuration <span class="k">for </span>Terraform,
rerun this <span class="nb">command </span>to reinitialize your working directory. If you forget, other
commands will detect it and remind you to <span class="k">do </span>so <span class="k">if </span>necessary.
</code></pre></div></div>

<p>Terraform has looked at all of the <code class="language-plaintext highlighter-rouge">*.tf</code> files, determined which providers are being used and has downloaded the appropriate plugins. These are stored in the <code class="language-plaintext highlighter-rouge">.terraform/</code> directory which has been created in the current path.</p>

<h2 id="planning-changes">Planning changes</h2>

<p>One amazing feature of Terraform is the ability to preview changes to get an idea of what’s actually going to happen when you apply them. Is this change going to modify my loadbalancer in-place or is it going to destroy it and recreate it, taking my application offline for precious minutes?</p>

<p>Let’s see what that looks like:</p>

<div class="language-shell highlighter-rouge"><div class="highlight"><pre class="highlight"><code><span class="nv">$ </span>terraform plan
Refreshing Terraform state <span class="k">in</span><span class="nt">-memory</span> prior to plan...
The refreshed state will be used to calculate this plan, but will not be
persisted to <span class="nb">local </span>or remote state storage.


<span class="nt">------------------------------------------------------------------------</span>

An execution plan has been generated and is shown below.
Resource actions are indicated with the following symbols:
  + create

Terraform will perform the following actions:

  + local_file.random
      <span class="nb">id</span>:        &lt;computed&gt;
      content:   <span class="s2">"</span><span class="k">${</span><span class="nv">random_pet</span><span class="p">.server.id</span><span class="k">}</span><span class="s2">"</span>
      filename:  <span class="s2">"/home/vagrant/workspace/tfdemo/random.txt"</span>

  + random_pet.server
      <span class="nb">id</span>:        &lt;computed&gt;
      length:    <span class="s2">"2"</span>
      separator: <span class="s2">"-"</span>


Plan: 2 to add, 0 to change, 0 to destroy.

<span class="nt">------------------------------------------------------------------------</span>

Note: You didn<span class="s1">'t specify an "-out" parameter to save this plan, so Terraform
can'</span>t guarantee that exactly these actions will be performed <span class="k">if</span>
<span class="s2">"terraform apply"</span> is subsequently run.
</code></pre></div></div>

<p>This is the first time we’re running it so all the resources we’ve specified are being created - see the <code class="language-plaintext highlighter-rouge">+</code> next to their name in the output.</p>

<p>Also pay attention to the “Note” - we haven’t saved this plan so whilst we’ve got a good idea what Terraform will do when we apply it, it’s not guaranteed to try to do the same thing. We can store the plan in a file with a unique name by appending a timestamp i.e. <code class="language-plaintext highlighter-rouge">terraform plan -out "plan-$(date +%s)"</code>.</p>

<p>Running that we instead get this at the end of the output:</p>
<div class="language-shell highlighter-rouge"><div class="highlight"><pre class="highlight"><code>...
This plan was saved to: plan-1527707537

To perform exactly these actions, run the following <span class="nb">command </span>to apply:
    terraform apply <span class="s2">"plan-1527707537"</span>
</code></pre></div></div>

<p>If we’re happy with this plan then we can apply it for real.</p>

<h2 id="applying-changes">Applying Changes</h2>

<p>When we run <code class="language-plaintext highlighter-rouge">terraform apply</code> and pass it the plan file we get output which looks like the following:</p>

<div class="language-shell highlighter-rouge"><div class="highlight"><pre class="highlight"><code><span class="nv">$ </span>terraform apply <span class="s2">"plan-1527707537"</span>
random_pet.server: Creating...
  length:    <span class="s2">""</span> <span class="o">=&gt;</span> <span class="s2">"2"</span>
  separator: <span class="s2">""</span> <span class="o">=&gt;</span> <span class="s2">"-"</span>
random_pet.server: Creation <span class="nb">complete </span>after 0s <span class="o">(</span>ID: leading-piranha<span class="o">)</span>
local_file.random: Creating...
  content:  <span class="s2">""</span> <span class="o">=&gt;</span> <span class="s2">"leading-piranha"</span>
  filename: <span class="s2">""</span> <span class="o">=&gt;</span> <span class="s2">"/home/vagrant/workspace/tfdemo/random.txt"</span>
local_file.random: Creation <span class="nb">complete </span>after 0s <span class="o">(</span>ID: 681f312327eab60da028b397bc85af8682fdc185<span class="o">)</span>

Apply <span class="nb">complete</span><span class="o">!</span> Resources: 2 added, 0 changed, 0 destroyed.

Outputs:

name <span class="o">=</span> leading-piranha
</code></pre></div></div>

<p>The Random provider gave us a pet name consisting of 2 words and the <code class="language-plaintext highlighter-rouge">output</code> directive showed it at the end of the program. The <code class="language-plaintext highlighter-rouge">local_file</code> resource wrote the name into a file called <code class="language-plaintext highlighter-rouge">random.txt</code> in the current directory:</p>

<div class="language-plaintext highlighter-rouge"><div class="highlight"><pre class="highlight"><code>$ cat random.txt
leading-piranha[vagrant@localhost tfdemo]$
</code></pre></div></div>

<h2 id="making-more-changes">Making More Changes</h2>

<p>Hmmm, there’s no newline at the end of the file. I’d prefer it to be formatted with one so I’ll add one into the HCL. The <code class="language-plaintext highlighter-rouge">content</code> in the <code class="language-plaintext highlighter-rouge">local_file</code> can be changed to, with a <code class="language-plaintext highlighter-rouge">\n</code> appended:</p>

<div class="language-hcl highlighter-rouge"><div class="highlight"><pre class="highlight"><code><span class="err">...</span>
  <span class="nx">content</span>     <span class="err">=</span> <span class="s2">"${random_pet.server.id}</span><span class="err">\</span><span class="s2">n"</span>                                      
<span class="err">...</span>
</code></pre></div></div>

<p>If we plan the changes we’ll see that <em>only</em> the file is scheduled to change. There’s no reason for the <code class="language-plaintext highlighter-rouge">random_pet</code> resource to be changed at all so Terraform uses it as it is.</p>

<div class="language-shell highlighter-rouge"><div class="highlight"><pre class="highlight"><code><span class="nv">$ </span>terraform plan <span class="nt">-out</span> <span class="s2">"plan-</span><span class="si">$(</span><span class="nb">date</span> +%s<span class="si">)</span><span class="s2">"</span>

Refreshing Terraform state <span class="k">in</span><span class="nt">-memory</span> prior to plan...
The refreshed state will be used to calculate this plan, but will not be
persisted to <span class="nb">local </span>or remote state storage.

random_pet.server: Refreshing state... <span class="o">(</span>ID: leading-piranha<span class="o">)</span>
local_file.random: Refreshing state... <span class="o">(</span>ID: 681f312327eab60da028b397bc85af8682fdc185<span class="o">)</span>

<span class="nt">------------------------------------------------------------------------</span>

An execution plan has been generated and is shown below.
Resource actions are indicated with the following symbols:
-/+ destroy and <span class="k">then </span>create replacement

Terraform will perform the following actions:

-/+ local_file.random <span class="o">(</span>new resource required<span class="o">)</span>
      <span class="nb">id</span>:       <span class="s2">"681f312327eab60da028b397bc85af8682fdc185"</span> <span class="o">=&gt;</span> &lt;computed&gt; <span class="o">(</span>forces new resource<span class="o">)</span>
      content:  <span class="s2">"leading-piranha"</span> <span class="o">=&gt;</span> <span class="s2">"leading-piranha</span><span class="se">\n</span><span class="s2">"</span> <span class="o">(</span>forces new resource<span class="o">)</span>
      filename: <span class="s2">"/home/vagrant/workspace/tfdemo/random.txt"</span> <span class="o">=&gt;</span> <span class="s2">"/home/vagrant/workspace/tfdemo/random.txt"</span>


Plan: 1 to add, 0 to change, 1 to destroy.

<span class="nt">------------------------------------------------------------------------</span>

This plan was saved to: plan-1528126805

To perform exactly these actions, run the following <span class="nb">command </span>to apply:
    terraform apply <span class="s2">"plan-1528126805"</span>
</code></pre></div></div>

<p>Applying the changes from the plan we’ve just made can <code class="language-plaintext highlighter-rouge">cat</code>ing the file again shows that there’s now a newline at the end:</p>
<div class="language-shell highlighter-rouge"><div class="highlight"><pre class="highlight"><code><span class="nv">$ </span>terraform apply <span class="s2">"plan-1528126805"</span>
local_file.random: Destroying... <span class="o">(</span>ID: 681f312327eab60da028b397bc85af8682fdc185<span class="o">)</span>
local_file.random: Destruction <span class="nb">complete </span>after 0s
local_file.random: Creating...
  content:  <span class="s2">""</span> <span class="o">=&gt;</span> <span class="s2">"leading-piranha</span><span class="se">\n</span><span class="s2">"</span>
  filename: <span class="s2">""</span> <span class="o">=&gt;</span> <span class="s2">"/home/vagrant/workspace/tfdemo/random.txt"</span>
local_file.random: Creation <span class="nb">complete </span>after 0s <span class="o">(</span>ID: 82c2862c8ae7053eb94b7aa498265335c5d22b22<span class="o">)</span>

Apply <span class="nb">complete</span><span class="o">!</span> Resources: 1 added, 0 changed, 1 destroyed.

Outputs:

name <span class="o">=</span> leading-piranha

<span class="nv">$ </span><span class="nb">cat </span>random.txt
leading-piranha
</code></pre></div></div>

<h2 id="variables">Variables</h2>

<p>In the <code class="language-plaintext highlighter-rouge">example.tf</code> file you can see that we declared a <code class="language-plaintext highlighter-rouge">variable</code> called <code class="language-plaintext highlighter-rouge">name_length</code> and referenced it in the <code class="language-plaintext highlighter-rouge">random_pet</code> resource (<code class="language-plaintext highlighter-rouge">length = "${var.name_length}"</code>); why not just hard code that number?</p>

<p>To aid code reuse, Terraform lets us pass in different values for the variables we’ve defined. We use the <code class="language-plaintext highlighter-rouge">-var</code> flag and the name of the variable, like this:</p>

<div class="language-shell highlighter-rouge"><div class="highlight"><pre class="highlight"><code><span class="nv">$ $ </span>terraform plan <span class="nt">-var</span> <span class="nv">name_length</span><span class="o">=</span>3
Refreshing Terraform state <span class="k">in</span><span class="nt">-memory</span> prior to plan...
The refreshed state will be used to calculate this plan, but will not be
persisted to <span class="nb">local </span>or remote state storage.

random_pet.server: Refreshing state... <span class="o">(</span>ID: leading-piranha<span class="o">)</span>
local_file.random: Refreshing state... <span class="o">(</span>ID: 82c2862c8ae7053eb94b7aa498265335c5d22b22<span class="o">)</span>

<span class="nt">------------------------------------------------------------------------</span>

An execution plan has been generated and is shown below.
Resource actions are indicated with the following symbols:
-/+ destroy and <span class="k">then </span>create replacement

Terraform will perform the following actions:

-/+ local_file.random <span class="o">(</span>new resource required<span class="o">)</span>
      <span class="nb">id</span>:        <span class="s2">"82c2862c8ae7053eb94b7aa498265335c5d22b22"</span> <span class="o">=&gt;</span> &lt;computed&gt; <span class="o">(</span>forces new resource<span class="o">)</span>
      content:   <span class="s2">"leading-piranha</span><span class="se">\n</span><span class="s2">"</span> <span class="o">=&gt;</span> <span class="s2">"</span><span class="k">${</span><span class="nv">random_pet</span><span class="p">.server.id</span><span class="k">}</span><span class="se">\n</span><span class="s2">"</span> <span class="o">(</span>forces new resource<span class="o">)</span>
      filename:  <span class="s2">"/home/vagrant/workspace/tfdemo/random.txt"</span> <span class="o">=&gt;</span> <span class="s2">"/home/vagrant/workspace/tfdemo/random.txt"</span>

-/+ random_pet.server <span class="o">(</span>new resource required<span class="o">)</span>
      <span class="nb">id</span>:        <span class="s2">"leading-piranha"</span> <span class="o">=&gt;</span> &lt;computed&gt; <span class="o">(</span>forces new resource<span class="o">)</span>
      length:    <span class="s2">"2"</span> <span class="o">=&gt;</span> <span class="s2">"3"</span> <span class="o">(</span>forces new resource<span class="o">)</span>
      separator: <span class="s2">"-"</span> <span class="o">=&gt;</span> <span class="s2">"-"</span>


Plan: 2 to add, 0 to change, 2 to destroy.

<span class="nt">------------------------------------------------------------------------</span>

Note: You didn<span class="s1">'t specify an "-out" parameter to save this plan, so Terraform
can'</span>t guarantee that exactly these actions will be performed <span class="k">if</span>
<span class="s2">"terraform apply"</span> is subsequently run.
</code></pre></div></div>

<p>The plan tells us again what’s going to happen - both resources will be destroyed and others created in their place. The file has to be recreated in this case because it’s dependent on the value from <code class="language-plaintext highlighter-rouge">random_pet</code>. Terraform works this out from the dependency graph it generates - it can work out what it needs to recreate based on what’s changed and what depends on that.</p>

<h3 id="aside-dependency-graph"><em>Aside: Dependency Graph</em></h3>

<p><em>The dependency graph for your infrastructure can be seen in the</em> [DOT language](https://en.wikipedia.org/wiki/DOT_(graph_description_language) <em>by running <code class="language-plaintext highlighter-rouge">terraform graph</code>. If you’ve got</em> <a href="http://www.graphviz.org/">Graphviz</a> <em>installed then you can render it by piping the output straight to the <code class="language-plaintext highlighter-rouge">dot</code> program:</em></p>

<div class="language-shell highlighter-rouge"><div class="highlight"><pre class="highlight"><code><span class="nv">$ </span>terraform graph | dot <span class="nt">-Tpng</span> <span class="nt">-o</span> tfdemo.png
</code></pre></div></div>

<p>This is a really simple example and no critical infrastructure is at stake so we can apply these changes without saving to a plan file by simply running <code class="language-plaintext highlighter-rouge">terraform apply</code> and either typing “yes” at the prompt or passing the <code class="language-plaintext highlighter-rouge">-auto-approve</code> flag:</p>

<div class="language-shell highlighter-rouge"><div class="highlight"><pre class="highlight"><code><span class="nv">$ </span>terraform apply <span class="nt">-var</span> <span class="nv">name_length</span><span class="o">=</span>3 <span class="nt">-auto-approve</span>
random_pet.server: Refreshing state... <span class="o">(</span>ID: leading-piranha<span class="o">)</span>
local_file.random: Refreshing state... <span class="o">(</span>ID: 82c2862c8ae7053eb94b7aa498265335c5d22b22<span class="o">)</span>
local_file.random: Destroying... <span class="o">(</span>ID: 82c2862c8ae7053eb94b7aa498265335c5d22b22<span class="o">)</span>
local_file.random: Destruction <span class="nb">complete </span>after 0s
random_pet.server: Destroying... <span class="o">(</span>ID: leading-piranha<span class="o">)</span>
random_pet.server: Destruction <span class="nb">complete </span>after 0s
random_pet.server: Creating...
  length:    <span class="s2">""</span> <span class="o">=&gt;</span> <span class="s2">"3"</span>
  separator: <span class="s2">""</span> <span class="o">=&gt;</span> <span class="s2">"-"</span>
random_pet.server: Creation <span class="nb">complete </span>after 0s <span class="o">(</span>ID: scarcely-intense-mammoth<span class="o">)</span>
local_file.random: Creating...
  content:  <span class="s2">""</span> <span class="o">=&gt;</span> <span class="s2">"scarcely-intense-mammoth</span><span class="se">\n</span><span class="s2">"</span>
  filename: <span class="s2">""</span> <span class="o">=&gt;</span> <span class="s2">"/home/vagrant/workspace/tfdemo/random.txt"</span>
local_file.random: Creation <span class="nb">complete </span>after 0s <span class="o">(</span>ID: a3f2f24388d1e4ddd72872a833469002f2ad5b75<span class="o">)</span>

Apply <span class="nb">complete</span><span class="o">!</span> Resources: 2 added, 0 changed, 2 destroyed.

Outputs:

name <span class="o">=</span> scarcely-intense-mammoth
</code></pre></div></div>

<p>Note that we need to pass the same parameters to the apply phase that we passed in planning. This is one very good reason to save the plan and use that when running <code class="language-plaintext highlighter-rouge">apply</code>.</p>

<h2 id="state">State</h2>

<p>Along with the <code class="language-plaintext highlighter-rouge">.terraform/</code> directory which stores the provider plugins you’ll notice that there’s a <code class="language-plaintext highlighter-rouge">terraform.tfstate</code> file there too. A quick examination shows that it’s text, which we can read!</p>

<div class="language-shell highlighter-rouge"><div class="highlight"><pre class="highlight"><code><span class="nv">$ </span>file terraform.tfstate
terraform.tfstate: ASCII text
</code></pre></div></div>

<p>This is the state of our resources, in JSON format. The state represents Terraform’s view of the defined resources. If you run the <code class="language-plaintext highlighter-rouge">plan</code> command with the same arguments in the same directory then Terraform will tell us that there’s nothing to do:</p>

<div class="language-shell highlighter-rouge"><div class="highlight"><pre class="highlight"><code><span class="nv">$ </span>terraform plan <span class="nt">-var</span> <span class="nv">name_length</span><span class="o">=</span>3

Refreshing Terraform state <span class="k">in</span><span class="nt">-memory</span> prior to plan...
The refreshed state will be used to calculate this plan, but will not be
persisted to <span class="nb">local </span>or remote state storage.

random_pet.server: Refreshing state... <span class="o">(</span>ID: scarcely-intense-mammoth<span class="o">)</span>
local_file.random: Refreshing state... <span class="o">(</span>ID: a3f2f24388d1e4ddd72872a833469002f2ad5b75<span class="o">)</span>

<span class="nt">------------------------------------------------------------------------</span>

No changes. Infrastructure is up-to-date.

This means that Terraform did not detect any differences between your
configuration and real physical resources that exist. As a result, no
actions need to be performed.
</code></pre></div></div>

<p>If you’re running Terraform to create your cloud infrastructure then make sure the state is committed to source control or - particularly if you’re working with other engineers - persisted in one of the <a href="https://www.terraform.io/docs/backends/index.html">supported backends</a>.</p>

<h2 id="wrapping-up">Wrapping Up</h2>

<p>This illustrates a typical workflow for Terraform: code -&gt; plan -&gt; apply -&gt; commit. To make it as easy as possible to follow along we’ve used providers which only operate locally, but if you added an <code class="language-plaintext highlighter-rouge">aws_instance</code> resource then the random server name we’ve generated could easily be used to set the <code class="language-plaintext highlighter-rouge">Name</code> tag on the EC2 instance. Terraform will pick up the standard <code class="language-plaintext highlighter-rouge">AWS_ACCESS_KEY_ID</code> and <code class="language-plaintext highlighter-rouge">AWS_SECRET_ACCESS_KEY</code> environment variables and your workflow remains unchanged as you provision real infrastructure.</p>]]></content><author><name></name></author><summary type="html"><![CDATA[What is Terraform and why should you care? How can you learn about it without having to provision real stuff in your Amazon account?]]></summary></entry><entry><title type="html">Why My Development Environment is the Best</title><link href="/article/why-my-development-environment-is-the-best" rel="alternate" type="text/html" title="Why My Development Environment is the Best" /><published>2018-04-11T00:00:00+00:00</published><updated>2018-04-11T00:00:00+00:00</updated><id>/article/my-development-environment</id><content type="html" xml:base="/article/why-my-development-environment-is-the-best"><![CDATA[<p><em>Or more accurately, what works for me right now.</em></p>

<p>As software developers we spend a lot of our day at the keyboard, typing. It’s natural that we spend time making that environment a pleasant and productive place in which to work.</p>

<p>Local development environments are often very personal and are tweaked and customised to the tastes of the individual developer. There are a finite number of editors and IDEs but an almost infinite combination of plugins, themes and customisations within those. In some of the more recent evolutions of my local environment I’ve rebelled against the culture of personalisation.</p>

<h2 id="my-tools">My Tools</h2>

<p>Almost all the software I write gets deployed and run in production on a server running some flavour of Linux. I run everything locally on a <a href="https://en.wikipedia.org/wiki/Virtual_machine">virtual machine</a> which is set up as close to production as I can get. Over the years this has been invaluable for catching bugs before they even get to a staging environment or reproducing production problems under safe conditions.</p>

<p>To manage and run virtual machines (VMs) I use the combination of <a href="https://www.virtualbox.org/">VirtualBox</a> and <a href="https://www.vagrantup.com/">Vagrant</a>. Once I’ve installed those I’m (nearly) ready to run a VM. I also use the <a href="https://github.com/dotless-de/vagrant-vbguest">vagrant-vbguest plugin</a> which manages the installation of the VirtualBox Guest Additions in the VM itself. These are used to share a workspace directory between my host machine and the Linux VM: <code class="language-plaintext highlighter-rouge">vagrant plugin install vagrant-vbguest</code></p>

<p>The configuration for a VM managed by Vagrant can be stored as code so here’s an example on GitHub of the main environment I use at the moment: https://github.com/grahamlyons/centos-dev</p>

<p>To run it: clone the repo, start the VM and then connect to it:</p>
<div class="language-shell highlighter-rouge"><div class="highlight"><pre class="highlight"><code>git clone git@github.com:grahamlyons/centos-dev.git
<span class="nb">cd </span>centos-dev
vagrant up <span class="o">&amp;&amp;</span> vagrant ssh <span class="nt">-c</span> <span class="s1">'tmux attach || tmux'</span>
</code></pre></div></div>

<p>The instructions in the <code class="language-plaintext highlighter-rouge">Vagrantfile</code> start from a CentOS 7 base image and:</p>
<ul>
  <li>specify a fixed IP address which can be used to refer to the VM</li>
  <li>mount a local <code class="language-plaintext highlighter-rouge">~/workspace/</code> directory inside the VM (at the same path)</li>
  <li>install some base packages, e.g. <code class="language-plaintext highlighter-rouge">tmux</code>, <code class="language-plaintext highlighter-rouge">vim</code>, <code class="language-plaintext highlighter-rouge">git</code> etc.</li>
  <li>install and sets up Docker</li>
  <li>copy some local configuration and credential files into the VM</li>
</ul>

<p>The SSH connection command also puts me into either an existing <a href="https://en.wikipedia.org/wiki/Tmux">tmux</a> session or starts a new one. Tmux is a great tool for creating multiple tabs and panes in a single SSH session. I don’t use any extra configuration for it beyond what’s installed on CentOS with the package.</p>

<h3 id="benefits-of-a-virtual-machine">Benefits of a Virtual machine</h3>

<p>The first time I was introduced to working inside a VM I was sold on it completely. It made so much sense to me to be as close to production as possible and installing software on Linux, using a proper package manager, is so much nicer than on OSX (or Windows - in the depths of my memory).</p>

<p>With the shared folder - <code class="language-plaintext highlighter-rouge">~/workspace/</code> in my case - I can use whatever editor I like on my host OS and the changes will always be inside the VM, ready to run.</p>

<p>Running a VM has also saved me from completely destroying my machine on more than one occasion, the worst of which was an accidental <code class="language-plaintext highlighter-rouge">rm -rf /</code> run as <code class="language-plaintext highlighter-rouge">root</code>. Always having a working machine that you can use to search for help with fixing problems is incredibly useful. If things get really back you can just destroy it and start again from your known good state.</p>

<h3 id="drawbacks-of-a-virtual-machine">Drawbacks of a Virtual machine</h3>

<p>Using a VM is not a perfect solution and running code inside a directory shared between the host machine and the guest VM can give performance problems. The shared directory is great for use with a simple editor but with an IDE, which will want to run your code for you, it can be complicated or impossible to run the code inside the virtual machine.</p>

<h2 id="my-editor">My Editor</h2>

<p>The first editor I ever used when I started working professionally was <a href="https://en.wikipedia.org/wiki/Macromedia_HomeSite">Homesite</a>, which betrays my vintage. After I was no longer able to get hold of that I looked around for something else and saw something called <a href="https://www.vim.org/">Vim</a> recommended. I was interested and downloaded it and opened it up. After a few minutes I managed to work out how to quit it and didn’t open it up again for a year or two.</p>

<h3 id="vim">Vim</h3>

<p>After throwing myself into Vim I now use it almost exclusively. Where I use something else I try to find a Vim key-bindings plugin for it. There is a big learning curve for Vim, and <code class="language-plaintext highlighter-rouge">vimtutor</code> was a big help, but now that I’m familiar with the movements and actions nothing lets me manipulate text faster.</p>

<h3 id="plugins-and-configuration">Plugins and Configuration</h3>

<p>My <code class="language-plaintext highlighter-rouge">.vimrc</code> file has gone through many iterations and it’s now roughly 10 lines:</p>
<div class="language-vim highlighter-rouge"><div class="highlight"><pre class="highlight"><code><span class="k">set</span> <span class="nb">expandtab</span>
<span class="k">set</span> <span class="nb">shiftwidth</span><span class="p">=</span><span class="m">4</span>
<span class="k">set</span> <span class="nb">tabstop</span><span class="p">=</span><span class="m">4</span>

<span class="k">set</span> <span class="nb">modeline</span>
<span class="k">set</span> <span class="nb">modelines</span><span class="p">=</span><span class="m">5</span>

<span class="k">set</span> <span class="k">nu</span>
<span class="k">set</span> <span class="nb">colorcolumn</span><span class="p">=</span><span class="m">80</span>

<span class="nb">syntax</span> enable

<span class="k">let</span> <span class="nv">g:netrw_liststyle</span><span class="p">=</span><span class="m">3</span>
<span class="k">if</span> <span class="nb">exists</span><span class="p">(</span><span class="s2">"*netrw_gitignore#Hide"</span><span class="p">)</span>
    <span class="k">let</span> <span class="nv">g:netrw_list_hide</span><span class="p">=</span>netrw_gitignore#Hide<span class="p">()</span>
<span class="k">endif</span>
</code></pre></div></div>

<p>I use spaces instead of tabs (who wouldn’t?); (for OSX, where it was turned off) it’s set to read Vim settings from the tops of files (http://vim.wikia.com/wiki/Modeline_magic); line numbers and syntax highlighting are on; there’s a column at 80 characters to stop my lines from getting too long and I’ve set directory listings to look like a tree.</p>

<p>Everything else I use in Vim is vanilla. Just getting used to the defaults allows me to move between different machines more easily and there’s less of my clever customisation and tweaking to remember and more widely available documentation to refer to.</p>

<h2 id="other-software">Other Software</h2>

<p>Over the past couple of years I’ve started running almost everything inside Docker containers so I’m <code class="language-plaintext highlighter-rouge">yum install</code>ing less and less. Almost everything is available in an image from Docker Hub and it’s so fast to start up once it’s been pulled down that it just makes so much sense. Running different versions of e.g. Node, Ruby or Python side by side is much simpler.</p>

<p>I still use <code class="language-plaintext highlighter-rouge">yum</code> to install utility packages like <code class="language-plaintext highlighter-rouge">telnet</code> or <code class="language-plaintext highlighter-rouge">jq</code>, and they’ll often make it into the configuration in the <code class="language-plaintext highlighter-rouge">Vagrantfile</code>.</p>

<h2 id="this-works-for-me-for-now">This Works for Me for Now</h2>

<p>So this is how my machine is set up at the moment, and it works really well for me. I run OSX and spend most of the time in Terminal, with one tab for my VM connection. I use Vim both on OSX and on the VM, and the same for Git.</p>

<p>It works well but I am always making changes. The introduction of Docker is more recent and is becoming more prominent. Let’s see what this looks like in a year.</p>]]></content><author><name></name></author><category term="devtips,productivity,infrastructure,development" /><summary type="html"><![CDATA[How I set up my computer for local development]]></summary></entry><entry><title type="html">Machine Learning for the Lazy Beginner</title><link href="/article/machine-learning-for-the-lazy-beginner" rel="alternate" type="text/html" title="Machine Learning for the Lazy Beginner" /><published>2018-02-12T00:00:00+00:00</published><updated>2018-02-12T00:00:00+00:00</updated><id>/article/machine-learning-for-beginners</id><content type="html" xml:base="/article/machine-learning-for-the-lazy-beginner"><![CDATA[<p>This article was prompted by a tweet I saw which asked for a walkthrough on training a machine learning service to recognise new members of 3 different data sets.</p>

<blockquote>
  <p>@rem: Being lazy here: I’m after a (machine learning) service that I can feed three separate datasets (to train with), and then I want to ask: “which dataset is <em>this</em> new bit of content most like”.</p>

  <p>Is there a walkthrough/cheatsheet/service for this?</p>
</blockquote>

<p>My first thought was that this sounds like a <a href="https://en.wikipedia.org/wiki/Statistical_classification"><em>classification</em></a> task, and the idea that there are 3 sets of data should be the other way round: there is one set of data and each item in the set has one of 3 labels.</p>

<p>I didn’t have a walkthrough in mind but I do know how to train a classifier to perform this exact task, so here is my walkthrough of classifying text documents using Javascript.</p>

<h2 id="do-you-have-adequate-supervision">Do You Have Adequate Supervision?</h2>

<p>Machine learning can be classified (no pun intended) as either supervised or unsupervised. The latter refers to problems where the data you feed to the algorithm has no predetermined label. You might have a bunch of text documents and you want to find out if they can be grouped together into similar categories - that would be an example of <a href="https://en.wikipedia.org/wiki/Cluster_analysis"><em>clustering</em></a>.</p>

<p>Supervised learning is where you know the outcome already. You have set of data in which each member fits into one of <em>n</em> categories, for example a set of data on customers to your e-commerce platform, labelled according to what category of product they’re likely to be interested in. You train your model against that data and use it predict what new customers might be interested in buying - this is an example of classification.</p>

<h2 id="get-in-training">Get in Training</h2>

<p>For the classification task we’ve said that we “train” a model against the data we know the labels for. What that means is that we feed each instance in a dataset into the classifier, saying which label it should have. We can then pass the classifier a new instance, to which we don’t know the label, and it will predict which class that fits into, based on what it’s seen before.</p>

<p>There’s a Javascript package called <a href="https://www.npmjs.com/package/natural"><code class="language-plaintext highlighter-rouge">natural</code></a> which has several different classifiers for working with text documents (natural language). Using one looks like this:</p>

<div class="language-javascript highlighter-rouge"><div class="highlight"><pre class="highlight"><code><span class="kd">const</span> <span class="p">{</span> <span class="nx">BayesClassifier</span> <span class="p">}</span> <span class="o">=</span> <span class="nx">require</span><span class="p">(</span><span class="dl">'</span><span class="s1">natural</span><span class="dl">'</span><span class="p">);</span>
<span class="kd">const</span> <span class="nx">classifier</span> <span class="o">=</span> <span class="k">new</span> <span class="nx">BayesClassifier</span><span class="p">();</span>

<span class="c1">// Feed documents in, labelled either 'nice' or 'nasty'</span>
<span class="nx">classifier</span><span class="p">.</span><span class="nx">addDocument</span><span class="p">(</span><span class="dl">'</span><span class="s1">You are lovely</span><span class="dl">'</span><span class="p">,</span> <span class="dl">'</span><span class="s1">nice</span><span class="dl">'</span><span class="p">);</span>
<span class="nx">classifier</span><span class="p">.</span><span class="nx">addDocument</span><span class="p">(</span><span class="dl">'</span><span class="s1">I really like you</span><span class="dl">'</span><span class="p">,</span> <span class="dl">'</span><span class="s1">nice</span><span class="dl">'</span><span class="p">);</span>
<span class="nx">classifier</span><span class="p">.</span><span class="nx">addDocument</span><span class="p">(</span><span class="dl">'</span><span class="s1">You are horrible</span><span class="dl">'</span><span class="p">,</span> <span class="dl">'</span><span class="s1">nasty</span><span class="dl">'</span><span class="p">);</span>
<span class="nx">classifier</span><span class="p">.</span><span class="nx">addDocument</span><span class="p">(</span><span class="dl">'</span><span class="s1">I do not like you</span><span class="dl">'</span><span class="p">,</span> <span class="dl">'</span><span class="s1">nasty</span><span class="dl">'</span><span class="p">);</span>

<span class="c1">// Train the model</span>
<span class="nx">classifier</span><span class="p">.</span><span class="nx">train</span><span class="p">();</span>

<span class="c1">// Predict which label these documents should have</span>
<span class="nx">classifier</span><span class="p">.</span><span class="nx">classify</span><span class="p">(</span><span class="dl">'</span><span class="s1">You smell horrible</span><span class="dl">'</span><span class="p">);</span>
<span class="c1">// nasty</span>
<span class="nx">classifier</span><span class="p">.</span><span class="nx">classify</span><span class="p">(</span><span class="dl">'</span><span class="s1">I like your face</span><span class="dl">'</span><span class="p">);</span>
<span class="c1">// 'nice'</span>
<span class="nx">classifier</span><span class="p">.</span><span class="nx">classify</span><span class="p">(</span><span class="dl">'</span><span class="s1">You are nice</span><span class="dl">'</span><span class="p">);</span>
<span class="c1">// 'nice'</span>
</code></pre></div></div>

<p>We add labelled data, train the model and then we can use it to predict the class of text we haven’t seen before. Hooray!</p>

<h2 id="performance-analysis">Performance Analysis</h2>

<p>Training a machine learning model with a dataset of 4 instances clearly isn’t something that’s going to be very useful - its experience of the problem domain is very limited. Machine learning and big data are somewhat synonymous because the more data you have the better you can train your model, in the same way that the more experience someone has of a topic the more they’re likely to know about it. So how do we know how clever our model is?</p>

<p>The way we evaluate supervised learning models is to split our data into a training set and a testing set, train it using one and test it using the other (I’ll leave you to guess which way round). The more data in the training set the better.</p>

<p>When we get the predictions for our test data we can determine if the model accurately predicted the class each item is labelled with. Adding up the successes and errors will give us numbers indicating how good the classifier is. For example, successes over total instances processed is our accuracy; errors divided by the total is the error rate. We can get more in-depth analysis by plotting a <a href="https://en.wikipedia.org/wiki/Confusion_matrix"><em>confusion matrix</em></a> showing actual classes against predictions:</p>

<table>
  <thead>
    <tr>
      <th> </th>
      <th> </th>
      <th>Actual</th>
      <th> </th>
    </tr>
  </thead>
  <tbody>
    <tr>
      <td> </td>
      <td> </td>
      <td><em>nice</em></td>
      <td><em>nasty</em></td>
    </tr>
    <tr>
      <td><strong>Predicted</strong></td>
      <td><em>nice</em></td>
      <td>21</td>
      <td>2</td>
    </tr>
    <tr>
      <td> </td>
      <td><em>nasty</em></td>
      <td>1</td>
      <td>10</td>
    </tr>
  </tbody>
</table>

<p>This is really valuable for assessing performance when it’s OK to incorrectly predict one class but not another. For example, when screening for terminal diseases it would be much better to bias for false positives and have a doctor check images manually rather than incorrectly give some patients the all clear.</p>

<h2 id="train-on-all-the-data">Train On All the Data</h2>

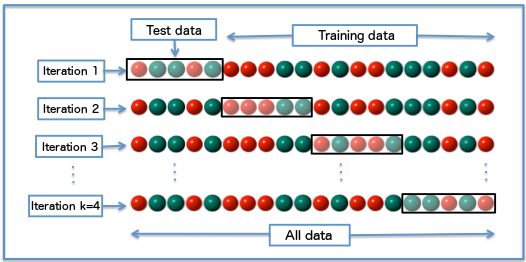
<p>One way to train with as much data as possible is to use <a href="https://en.wikipedia.org/wiki/Cross-validation_%28statistics%29"><em>cross validation</em></a>, where we take a small subset of our data to test on and use the rest for training. A commonly used technique is <em>k-fold</em> cross validation, where the dataset is divided into <em>k</em> different subsets (<em>k</em> can be any number, even the number of instances in the dataset), each of which is used as a testing set while the rest is used for training - the process is repeated until each subset has been used for testing i.e. <em>k</em> times.</p>

<p><img src="https://upload.wikimedia.org/wikipedia/commons/1/1c/K-fold_cross_validation_EN.jpg" alt="k-fold cross validation" /></p>

<h2 id="tweet-data-example">Tweet Data Example</h2>

<p>I’ve put together an example using the <code class="language-plaintext highlighter-rouge">natural</code> Javascript package. It gets data from Twitter, searching for 3 different hashtags, then trains a model using those 3 hashtags as classes and evaluates the performance of the trained model. The output looks like this:</p>

<div class="language-plaintext highlighter-rouge"><div class="highlight"><pre class="highlight"><code>$ node gather.js
Found 93 for #javascript
Found 100 for #clojure
Found 68 for #python

$ node train.js
{ positives: 251, negatives: 10 }
Accuracy: 96.17%
Error: 3.83%
</code></pre></div></div>

<p>The code is on Github: <a href="https://github.com/grahamlyons/classification-js">classification-js</a></p>

<h2 id="machine-learning-is-that-easy">Machine Learning is That Easy?!</h2>

<p>Well, no. The example is really trivial and doesn’t do any pre-processing on the gathered data: it doesn’t strip out the hashtag that it searched for from the text (meaning that it would probably struggle to predict a tweet about Python that didn’t include “#python”); it doesn’t remove any <a href="https://en.wikipedia.org/wiki/Stop_words"><em>stop words</em></a> (words that don’t really add any value, such as <em>a</em> or <em>the</em>. In fact, <code class="language-plaintext highlighter-rouge">natural</code> does this for us when we feed documents in, but we didn’t know that…); it doesn’t expand any of the shortened URLs in the text (<em>learnjavascript.com</em> surely means more than <em>t.co</em>). We don’t even look at the gathered data before using it, for example graphing word-frequencies to get an idea of what we’ve got: are some of the “#python” tweets from snake enthusiasts talking about their terrariums?</p>

<p>To miss-quote Tom Lehrer, machine learning is like a sewer: what you get out depends on what you put in.</p>

<h2 id="wrapping-up">Wrapping Up</h2>

<p>The aim of this article was to give an overview of how a machine learning model is trained to perform a classification task. Hopefully, for the beginner, this goes some way to lifting the lid on some of that mystery.</p>

<p><em>Cover image by: https://www.flickr.com/photos/mattbuck007/</em></p>]]></content><author><name></name></author><category term="machinelearning,javascript" /><summary type="html"><![CDATA[An overview of classification using Javascript]]></summary></entry><entry><title type="html">Everything You Need To Know About Networking On AWS</title><link href="/article/everything-you-need-to-know-about-networking-on-aws" rel="alternate" type="text/html" title="Everything You Need To Know About Networking On AWS" /><published>2018-01-28T00:00:00+00:00</published><updated>2018-01-28T00:00:00+00:00</updated><id>/article/networking-on-aws</id><content type="html" xml:base="/article/everything-you-need-to-know-about-networking-on-aws"><![CDATA[<p>Disclaimer: I’m not a network engineer and never have been - a tame network engineer has been consulted to ensure factual and terminological accuracy. The following is an in-exhaustive run down of everything I’ve learnt from building and using network infrastructure on Amazon Web Services. If you find you have no reference point for this information then have a poke around the “VPC” section of the AWS control panel (or get in touch to tell me I’m talking nonsense).</p>

<h2 id="parts-of-a-network-you-should-know-about">Parts of a Network You Should Know About</h2>

<p>If you’re running infrastructure and applications on AWS then you will encounter all of these things. They’re not the only parts of a network setup but they are, in my experience, the most important ones.</p>

<h3 id="vpc">VPC</h3>

<p>A virtual private cloud - VPC - is a private network space in which you can run your infrastructure. It has an address space (CIDR range) which you choose e.g. <code class="language-plaintext highlighter-rouge">10.0.0.0/16</code>. This determines how many IP addresses you can assign within the VPC. Each server you create inside the VPC will need an IP address so this address space defines the limit of how many resources you can have within the network. The <code class="language-plaintext highlighter-rouge">10.0.0.0/16</code> address space can use the addresses from <code class="language-plaintext highlighter-rouge">10.0.0.0</code> to <code class="language-plaintext highlighter-rouge">10.0.255.255</code>, which is 65,536 IP addresses.</p>

<p>The VPC is the basis of your network on AWS and all new accounts include a default VPC with a subnets in each availability zone.</p>

<div class="language-plaintext highlighter-rouge"><div class="highlight"><pre class="highlight"><code>+---------------+
|     VPC       |     The Internet
|               |
|               |
|  10.0.0.0/16  |
|               |
|               |
+---------------+
</code></pre></div></div>

<h3 id="subnets">Subnets</h3>

<p>A subnet is a section of your VPC, with its own CIDR range and rules on how traffic can flow. Its CIDR range has to be a subset of the VPC’s, for example <code class="language-plaintext highlighter-rouge">10.0.1.0/24</code> which would allow for IPs from <code class="language-plaintext highlighter-rouge">10.0.1.0</code> to <code class="language-plaintext highlighter-rouge">10.0.1.255</code> giving 256 possible IP addresses.</p>

<p>Subnets are often denominated as ‘public’ or ‘private’ depending on whether traffic can reach them from outside the VPC (the Internet). This visibility is controlled by the traffic routing rules and each subnet can have its own rules.</p>

<p>A subnet has to be in a specific availability zone within a region so it’s good practice to have a subnet in each zone. If you plan to have public and private subnets then there should be one of each per availability zone.</p>

<div class="language-plaintext highlighter-rouge"><div class="highlight"><pre class="highlight"><code>+---------------------------+
|            VPC            |
|                           |
+------------+ +------------+
||  Subnet 1 | |  Subnet 2 ||
||10.0.1.0/24| |10.0.2.0/24||
||           | |           ||
|------------+ +------------|
+---------------------------+
</code></pre></div></div>
<h4 id="availability-zones">Availability Zones</h4>

<p>We’ve said that there should be subnets per availability zone, but what does that actually mean?</p>

<p>Each AWS region is divided into 2 or more different zones which, between them, aim to guarantee a very high level of availability for that region. Essentially, at least one zone should be able to operate, even if others suffer outages (:fire:).</p>

<div class="language-plaintext highlighter-rouge"><div class="highlight"><pre class="highlight"><code>+----------+          +----------+
|us-ea)t-1a|          |us-east-1b|
|_____(____|          |__________|
|     )    |          |          |
|   ( &amp;()  |          |    ✔     |
|  ) () &amp;( |          |    8-)   |
+----------+          +----------+
</code></pre></div></div>

<h3 id="routing-tables">Routing Tables</h3>

<p>A routing table contains rules about how IP packets in the subnets can travel to different IP addresses. There is always a default route table which will only allow traffic to travel locally, within the VPC. If a subnet has no routing table associated with it then it uses the default one. These would be ‘private’ subnets.</p>

<p>If you want external traffic to be able to get to a subnet then you need to create a routing table with a rule explicitly allowing this. Subnets associated to that routing table would be ‘public’.</p>

<p>All of the subnets in the default VPCs are associated with a route table which makes them public.</p>

<h3 id="internet-gateways">Internet Gateways</h3>

<p>The routing table which makes a subnet public needs to reference an Internet gateway to allow the flow of external IP packets into and out of the VPC. You create your Internet gateway and then create a rule which says that packets to <code class="language-plaintext highlighter-rouge">0.0.0.0/0</code> - all IP addresses - need to go to there.</p>

<div class="language-plaintext highlighter-rouge"><div class="highlight"><pre class="highlight"><code>          Route table
         +-------------------+
         | 10.0.0.0/8: local | Requests within the VPC go over local connections.
      +--+ 0.0.0.0/0: ig-123 | Requests to any other IPs go via the Internet Gateway.
      |  |                   |
      |  +-------------------+
      |
      |
+-----+-------+          +-------------+
|  Subnet 1   |          |  Subnet 2   |
| 10.0.1.0/24 |          | 10.0.2.0/24 |
|             |          |             |
|             | 10.0.2.9 |             |
|             +---------&gt;|             |
|             |          |             |
+-------+-----+          +-------------+
        | 8.8.4.4
        |
        |   +--------+
        +--&gt;| ig-123 |
            |        +-----&gt; The Internet
            +--------+
</code></pre></div></div>

<h3 id="nat-gateways">NAT Gateways</h3>

<p>If you have an EC2 instance in a private subnet - one which doesn’t allow traffic from the Internet to reach it - then there’s also no way for IP packets to reach the Internet. We need a mechanism for sending those packets out, and then routing the replies correctly. This is called network address translation and is very likely done in your house by your wifi router.</p>

<p>A NAT gateway is a device which sits in the public subnets, accepts any IP packets bound for the Internet coming from the private subnets, sends those packets on to their destination and then sends the returning packets back to the source.</p>

<p>It’s not necessary to have NAT gateways if you don’t intend instances in your private subnets to talk outside if your VPC but if you do need to do that e.g. using an external API, SaaS database etc. then you can simply set up an EC2 instance (might be cheaper, depending on your traffic), configured appropriately, or use an AWS managed NAT gateway resource (will be easier to manage because you won’t be doing it).</p>

<div class="language-plaintext highlighter-rouge"><div class="highlight"><pre class="highlight"><code>  +---------------------+
  |   Public Subnet     |
  |   10.0.1.0/24       |
  |                     |
  |    +------------+   |
  |    |            +-----------&gt;   The Internet
  |    |  nat-123   |   |
  |    |            |   |
  |    +-------^----+   |
  |            |        |
  +------------|--------+
               |
               | 8.8.4.4
               |                       Route table
  +------------+---------+    +---------------------+
  |  Private Subnet      +----+  10.0.0.0/16: local |
  |  10.0.20.0/24        |    |  0.0.0.0/0: nat-123 |
  |                      |    +---------------------+
  +----------------------+
</code></pre></div></div>
<ul>
  <li>The public subnet contains the NAT gateway</li>
  <li>A request is made from the private subnet to an IP address somewhere on the Internet</li>
  <li>The route table says that it needs to go to the NAT gateway</li>
  <li>The NAT gateway sends it on</li>
</ul>

<h3 id="security-groups">Security Groups</h3>

<p>VPC network Security groups denote what traffic can flow to (and from) EC2 instances within your VPC. A security groups can specify ingress (inbound) and egress (outbound) traffic rules, limiting them to certain sources (inbound) and destinations (outbound). They are associated with EC2 instances rather than subnets.</p>

<p>By default all traffic is allowed out, but no traffic is allowed in. Inbound rules can specify a source address - either a CIDR block or another security group - and a port range. When the source is another security group then that must be within the same VPC. For example, a VPC is created with a default security group which allows traffic from anything which has that same security group. Assigning the group to everything created in the VPC (not necessarily the most secure practice) means that all those resources can talk to each another.</p>

<div class="language-plaintext highlighter-rouge"><div class="highlight"><pre class="highlight"><code>                   +---------------+
                   | sg-abcde      |
                   | ALLOW TCP 443 |
                   +----+----------+
                         |
                    +----+------+
                    |  i-67890  |
 10.0.1.123:22      |           | 10.0.1.123:443
------------------&gt;X|           &lt;----------------
                    |           |
                    +-----------+
</code></pre></div></div>
<ul>
  <li>An instance (i-67890) has a security group (sg-abcde) which allows TCP traffic on port 443</li>
  <li>A request is made to its IP address (10.0.1.123) on port 22 which doesn’t get through</li>
  <li>A request is made to port 443 on the instance and the traffic is allowed</li>
</ul>

<h2 id="putting-it-all-together">Putting it All Together</h2>

<p>The complete picture of your virtual private network looks something like the picture below, with public and private subnets spread across availability zones, network address translation sitting in the public subnets and route tables to specify how packets are routed. EC2 instances are run in any subnet and have security groups attached to them.</p>

<div class="language-plaintext highlighter-rouge"><div class="highlight"><pre class="highlight"><code>                                        +-------+                                  
                                        | ig-1  |                                  
                                        |       |                                  
        vpc-123: 10.0.0.0/16  |         |       |        |                         
       +----------------------+---------+-------+--------+---------------------+
       |                      |                          |                     |   
       |  +-----+             |  +-----+                 |  +-----+            |   
       |  | NAT |             |  | NAT |                 |  | NAT |            |   
public |  |     |             |  |     |                 |  |     |            |   
subnets|  +-----+             |  +-----+                 |  +-----+            |   
       |                      |                          |                     |   
       |                      |                          |                     |   
       |                      |                          |                     |   
       |              +-------+                  +-------+             +-------+
       |              | rt-1a |                  | rt-1b |             | rt-1c |
       | 10.0.1.0/24  |       | 10.0.2.0/24      |       | 10.0.3.0/24 |       |   
-------+-----------------------------------------------------------------------+
       | 10.0.4.0/24  | rt-2a | 10.0.5.0/24      | rt-2b | 10.0.6.0/24 | rt-2c |
       |              |       |                  |       |             |       |   
       |              +-------+                  +-------+             +-------+
private|                      |                          |                     |   
subnets|                      |                          |                     |   
       |                      |                          |                     |   
       |                      |                          |                     |   
       |                      |                          |                     |   
       |                      |                          |                     |   
       |                      |                          |                     |   
       |                      |                          |                     |   
       +----------------------+--------------------------+---------------------+
       |         AZ 1         |          AZ 2            |        AZ 3         |
</code></pre></div></div>]]></content><author><name></name></author><category term="AWS," /><category term="Networking" /><summary type="html"><![CDATA[An overview of virtual private networking on Amazon Web Services - with ASCII diagrams!]]></summary></entry><entry><title type="html">The Quickest Way to Run Python in Docker</title><link href="/article/the-quickest-way-to-run-python-in-docker" rel="alternate" type="text/html" title="The Quickest Way to Run Python in Docker" /><published>2017-11-15T00:00:00+00:00</published><updated>2017-11-15T00:00:00+00:00</updated><id>/article/quickest-way-to-run-python-on-docker</id><content type="html" xml:base="/article/the-quickest-way-to-run-python-in-docker"><![CDATA[<p>I love Python. I think it’s a beautifully designed language with a philosophy that I really appreciate as a developer trying to get stuff done. Just run this at a command prompt: <code class="language-plaintext highlighter-rouge">python -m this</code></p>

<div class="language-plaintext highlighter-rouge"><div class="highlight"><pre class="highlight"><code>Beautiful is better than ugly.
Explicit is better than implicit.
Simple is better than complex.
Complex is better than complicated.
Flat is better than nested.
Sparse is better than dense.
Readability counts.
Special cases aren't special enough to break the rules.
Although practicality beats purity.
Errors should never pass silently.
Unless explicitly silenced.
In the face of ambiguity, refuse the temptation to guess.
There should be one-- and preferably only one --obvious way to do it.
Although that way may not be obvious at first unless you're Dutch.
Now is better than never.
Although never is often better than *right* now.
If the implementation is hard to explain, it's a bad idea.
If the implementation is easy to explain, it may be a good idea.
Namespaces are one honking great idea -- let's do more of those!
</code></pre></div></div>

<p>What’s not so nice is Python packaging. It’s awkward, it’s confusing - it’s getting better but it’s still not nearly as nice as it is in other languages (Ruby, Java, Javascript).</p>

<p>Docker is a collection of various Linux features  - namespaces, cgroups, union file-system - put together in such a way that you can package and distribute software in a language-agnostic container. Docker is a great way to skirt the pain of Python packaging.</p>

<p>To install it, go to https://www.docker.com/ and under the “Get Docker” link choose the version for your operating system.</p>

<h2 id="just-enough-docker">Just Enough Docker</h2>

<p>So. What’s the least we can get away with? Or, what’s the least I can write to illustrate this? Well, if we use the <code class="language-plaintext highlighter-rouge">onbuild</code> Python Docker image, then not much.</p>

<p>Imagine we have a super-simple Flask app which just has one route, returning a fixed string (Hello, World?). We need very little, but we do have the dependency on Flask. Even on my Mac, with the latest OS (OK, not High Sierra just yet), the default Python installation doesn’t include the <code class="language-plaintext highlighter-rouge">pip</code> package manager. What the hell? It does include <code class="language-plaintext highlighter-rouge">easy_install</code>, so I could <code class="language-plaintext highlighter-rouge">easy_install pip</code>, or rather <code class="language-plaintext highlighter-rouge">sudo easy_install pip</code> because it’ll go in a global location. Then I could globally install the <code class="language-plaintext highlighter-rouge">flask</code> package too. Woop-de-doo. Which version is now globally installed on my system? Who knows!(?)</p>

<p>Let’s not do that. Let’s create our <code class="language-plaintext highlighter-rouge">requirements.txt</code> file:</p>
<div class="language-shell highlighter-rouge"><div class="highlight"><pre class="highlight"><code><span class="nb">echo </span>Flask <span class="o">&gt;</span> requirements.txt
</code></pre></div></div>

<p>And our Flask app:</p>
<div class="language-python highlighter-rouge"><div class="highlight"><pre class="highlight"><code><span class="kn">from</span> <span class="nn">flask</span> <span class="kn">import</span> <span class="n">Flask</span>

<span class="n">app</span> <span class="o">=</span> <span class="n">Flask</span><span class="p">(</span><span class="n">__name__</span><span class="p">)</span>

<span class="o">@</span><span class="n">app</span><span class="p">.</span><span class="n">route</span><span class="p">(</span><span class="s">'/'</span><span class="p">)</span>
<span class="k">def</span> <span class="nf">index</span><span class="p">():</span>
    <span class="k">return</span> <span class="s">'Hello, World!'</span>


<span class="k">if</span> <span class="n">__name__</span> <span class="o">==</span> <span class="s">'__main__'</span><span class="p">:</span>
    <span class="n">app</span><span class="p">.</span><span class="n">run</span><span class="p">(</span><span class="n">host</span><span class="o">=</span><span class="s">'0.0.0.0'</span><span class="p">)</span>
</code></pre></div></div>

<p>And <em>then</em> let’s have a <code class="language-plaintext highlighter-rouge">Dockerfile</code> too:</p>
<div class="language-shell highlighter-rouge"><div class="highlight"><pre class="highlight"><code><span class="nb">echo </span>FROM python:onbuild <span class="o">&gt;&gt;</span> Dockerfile
</code></pre></div></div>

<h2 id="build-it">Build It</h2>

<p>OK, so let’s build it:</p>
<div class="language-shell highlighter-rouge"><div class="highlight"><pre class="highlight"><code><span class="nv">$ </span>docker build <span class="nt">-t</span> myapp.local <span class="nb">.</span>
Sending build context to Docker daemon  4.096kB
Step 1/1 : FROM python:onbuild
<span class="c"># Executing 3 build triggers...</span>
Step 1/1 : COPY requirements.txt /usr/src/app/
 <span class="nt">---</span><span class="o">&gt;</span> Using cache
Step 1/1 : RUN pip <span class="nb">install</span> <span class="nt">--no-cache-dir</span> <span class="nt">-r</span> requirements.txt
 <span class="nt">---</span><span class="o">&gt;</span> Using cache
Step 1/1 : COPY <span class="nb">.</span> /usr/src/app
 <span class="nt">---</span><span class="o">&gt;</span> Using cache
 <span class="nt">---</span><span class="o">&gt;</span> 79fdf87107de
Successfully built 79fdf87107de
Successfully tagged myapp.local:latest
</code></pre></div></div>

<p>Was that it? Is it built? Yup:</p>
<div class="language-shell highlighter-rouge"><div class="highlight"><pre class="highlight"><code><span class="nv">$ </span>docker image <span class="nb">ls </span>myapp.local
REPOSITORY          TAG                 IMAGE ID            CREATED             SIZE
myapp.local         latest              c58ad169cb28        4 seconds ago       700MB
</code></pre></div></div>

<h2 id="run-it">Run It</h2>

<p>Great, our app is inside a container! What next? Run the container like this:</p>
<div class="language-shell highlighter-rouge"><div class="highlight"><pre class="highlight"><code><span class="nv">$ </span>docker run <span class="nt">--rm</span> myapp.local python server.py
 <span class="k">*</span> Running on http://0.0.0.0:5000/ <span class="o">(</span>Press CTRL+C to quit<span class="o">)</span>
</code></pre></div></div>

<p>That tells the <code class="language-plaintext highlighter-rouge">docker</code> command to <code class="language-plaintext highlighter-rouge">run</code> the <code class="language-plaintext highlighter-rouge">myapp.local</code> container (which we built), to remove it when it stops (<code class="language-plaintext highlighter-rouge">--rm</code>) and to run the command <code class="language-plaintext highlighter-rouge">python server.py</code> inside it. Amazing! So can we see our app now?</p>

<h2 id="the-final-piece">The Final Piece</h2>

<p>We can’t see our app at the moment because although it’s running perfectly inside the container it’s not accessible anywhere else. The message we get when we run it says it’s listening on port <code class="language-plaintext highlighter-rouge">5000</code>, but if we try to access that on the same host we get an error:</p>
<div class="language-shell highlighter-rouge"><div class="highlight"><pre class="highlight"><code><span class="nv">$ </span>curl localhost:5000
curl: <span class="o">(</span>7<span class="o">)</span> Failed connect to localhost:5000<span class="p">;</span> Connection refused
</code></pre></div></div>

<p>We need to expose the port outside the container that it’s running in:</p>
<div class="language-shell highlighter-rouge"><div class="highlight"><pre class="highlight"><code>docker run <span class="nt">--rm</span> <span class="nt">-p</span> 5001:5000 myapp.local python server.py
</code></pre></div></div>

<p>The <code class="language-plaintext highlighter-rouge">-p</code> argument maps your local <code class="language-plaintext highlighter-rouge">5001</code> port to <code class="language-plaintext highlighter-rouge">5000</code> inside the container (they can just be the same but I’ve made them different just to illustrate where the host and container ones are).</p>

<p>## OK, not quite the end…</p>

<p>So I found out when I was writing this that:</p>
<blockquote>
  <p>The ONBUILD image variants are deprecated, and their usage is discouraged.</p>
</blockquote>

<p>That’s OK - you wouldn’t really use the <code class="language-plaintext highlighter-rouge">ONBUILD</code> image for anything serious, and the <code class="language-plaintext highlighter-rouge">Dockerfile</code> that defines it is very easy to understand. Check it out for yourself and see how it works: https://github.com/docker-library/python/blob/f12c2d/3.6/jessie/onbuild/Dockerfile</p>

<p>We can replace the contents of our <code class="language-plaintext highlighter-rouge">Dockerfile</code> with the following and get the same result:</p>
<div class="language-Dockerfile highlighter-rouge"><div class="highlight"><pre class="highlight"><code><span class="k">FROM</span><span class="s"> python</span>

<span class="k">RUN </span><span class="nb">mkdir</span> <span class="nt">-p</span> /usr/src/app
<span class="k">WORKDIR</span><span class="s"> /usr/src/app</span>

<span class="k">COPY</span><span class="s"> requirements.txt /usr/src/app/</span>
<span class="k">RUN </span>pip <span class="nb">install</span> <span class="nt">--no-cache-dir</span> <span class="nt">-r</span> requirements.txt

<span class="k">COPY</span><span class="s"> . /usr/src/app</span>
</code></pre></div></div>

<p>I’ve just removed the <code class="language-plaintext highlighter-rouge">ONBUILD</code> directives (plus the <code class="language-plaintext highlighter-rouge">3.6-jessie</code> Python version - we can just take the latest).</p>

<h2 id="really-the-end">Really The End</h2>

<p>So that’s our minimal example of how to run a Python app with its dependencies inside a Docker container. Docker is an amazing piece of technology and it’s no surprise that the <a href="https://www.bloomberg.com/news/articles/2017-08-09/docker-is-said-to-be-raising-funding-at-1-3-billion-valuation">company</a> is <a href="https://www.sdxcentral.com/articles/news/sources-microsoft-tried-to-buy-docker-for-4b/2016/06/">valued</a> so <a href="https://www.forbes.com/sites/mikekavis/2015/07/16/5-reasons-why-docker-is-a-billion-dollar-company/#47e077c1f04f">highly</a>. In this instance it provides a clean way for us to avoid pain with Python packaging, but we now also have a container image with our app inside which could be distributed and run on any other system which can run Docker.</p>]]></content><author><name></name></author><summary type="html"><![CDATA[What's the least effort required to get some Python into a Docker container?]]></summary></entry><entry><title type="html">Verifying SSL Connections to Amazon S3 in CentOS 6 via Ruby</title><link href="/article/verifying-ssl-connections-to-amazon-s3-in-centos-6-via-ruby" rel="alternate" type="text/html" title="Verifying SSL Connections to Amazon S3 in CentOS 6 via Ruby" /><published>2015-06-10T00:00:00+00:00</published><updated>2015-06-10T00:00:00+00:00</updated><id>/article/centos-certs-ssl-error</id><content type="html" xml:base="/article/verifying-ssl-connections-to-amazon-s3-in-centos-6-via-ruby"><![CDATA[<p>Whilst building a development virtual machine to distribute to my colleagues I ran into a problem when using the Bundler gem in Ruby. Bundler is a dependency manager and so makes lots of HTTP requests to fetch the necessary Ruby gems and I found that <code class="language-plaintext highlighter-rouge">bundle install</code> commands kept failing with an SSL error:</p>

<div class="language-plaintext highlighter-rouge"><div class="highlight"><pre class="highlight"><code> OpenSSL::SSL::SSLError: SSL_connect returned=1 errno=0 state=SSLv3 read server certificate B: certificate verify failed
</code></pre></div></div>

<p>I was using the latest Ruby version, installed via the latest version of RVM (the Ruby version manager) and the latest version of CentOS 6 but no matter what I did I couldn’t stop it from blowing up at some point during the installation of loads of gems.</p>

<p>After much time spent banging my head against all of these moving parts I found that it consistently failed on a particular line in the Ruby HTTP library when making an SSL connection to an Amazon S3 endpoint (lots of gems are stored on S3). Being able to reproduce the problem offered some small comfort; SSL isn’t something I’m an expert on but at least I knew where to start digging.</p>

<div class="language-plaintext highlighter-rouge"><div class="highlight"><pre class="highlight"><code>2.1.4 :001 &gt; require 'net/http'
 =&gt; true 
2.1.4 :002 &gt; Net::HTTP.get(URI.parse('https://s3.amazonaws.com'))
OpenSSL::SSL::SSLError: SSL_connect returned=1 errno=0 state=SSLv3 read server certificate B: certificate verify failed
        from /home/vagrant/.rvm/rubies/ruby-2.1.4/lib/ruby/2.1.0/net/http.rb:920:in `connect'
        from /home/vagrant/.rvm/rubies/ruby-2.1.4/lib/ruby/2.1.0/net/http.rb:920:in `block in connect'
        from /home/vagrant/.rvm/rubies/ruby-2.1.4/lib/ruby/2.1.0/timeout.rb:76:in `timeout'
        from /home/vagrant/.rvm/rubies/ruby-2.1.4/lib/ruby/2.1.0/net/http.rb:920:in `connect'
        from /home/vagrant/.rvm/rubies/ruby-2.1.4/lib/ruby/2.1.0/net/http.rb:863:in `do_start'
        from /home/vagrant/.rvm/rubies/ruby-2.1.4/lib/ruby/2.1.0/net/http.rb:852:in `start'
        from /home/vagrant/.rvm/rubies/ruby-2.1.4/lib/ruby/2.1.0/net/http.rb:583:in `start'
        from /home/vagrant/.rvm/rubies/ruby-2.1.4/lib/ruby/2.1.0/net/http.rb:478:in `get_response'
        from /home/vagrant/.rvm/rubies/ruby-2.1.4/lib/ruby/2.1.0/net/http.rb:455:in `get'
        from (irb):4
        from /home/vagrant/.rvm/rubies/ruby-2.1.4/bin/irb:11:in `&lt;main&gt;'
</code></pre></div></div>

<p>A great tool from Mislav Marohnić (<a href="https://github.com/mislav">mislav</a> on Github) - <a href="https://raw.githubusercontent.com/mislav/ssl-tools/master/doctor.rb"><code class="language-plaintext highlighter-rouge">doctor.rb</code></a> - told me that the CA (certificate authority) certificate couldn’t be verified:</p>

<div class="language-plaintext highlighter-rouge"><div class="highlight"><pre class="highlight"><code>$ ruby doctor.rb s3.amazonaws.com
/home/vagrant/.rvm/rubies/ruby-2.1.4/bin/ruby (2.1.4-p265)
OpenSSL 1.0.1e 11 Feb 2013: /etc/pki/tls
SSL_CERT_DIR=""
SSL_CERT_FILE=""

HEAD https://s3.amazonaws.com:443
OpenSSL::SSL::SSLError: SSL_connect returned=1 errno=0 state=SSLv3 read server certificate B: certificate verify failed

The server presented a certificate that could not be verified:
  subject: /C=US/O=VeriSign, Inc./OU=VeriSign Trust Network/OU=(c) 2006 VeriSign, Inc. - For authorized use only/CN=VeriSign Class 3 Public Primary Certification Authority - G5
  issuer: /C=US/O=VeriSign, Inc./OU=Class 3 Public Primary Certification Authority
  error code 20: unable to get local issuer certificate
</code></pre></div></div>

<p>So it would seem that this isn’t a problem in Ruby at all but a more general SSL error. A quick check with OpenSSL shows us that the verification does indeed return an error code of <code class="language-plaintext highlighter-rouge">20</code>:</p>

<div class="language-plaintext highlighter-rouge"><div class="highlight"><pre class="highlight"><code>$ openssl s_client -host s3.amazonaws.com -port 443
...
Verify return code: 20 (unable to get local issuer certificate)
...
</code></pre></div></div>

<p>I’m sure we’re all intimately familiar with the verification return codes within OpenSSL, but for those who aren’t a quick check of the <code class="language-plaintext highlighter-rouge">man</code> page confirms that the certificate can’t be verified:</p>

<div class="language-plaintext highlighter-rouge"><div class="highlight"><pre class="highlight"><code>$ man verify
...
20 X509_V_ERR_UNABLE_TO_GET_ISSUER_CERT_LOCALLY: unable to get local issuer certificate
the issuer certificate could not be found: this occurs if the issuer certificate of an untrusted certificate cannot be found.
...
</code></pre></div></div>

<p>OK, so we can now see that it’s a Verisign certificate with the organisational unit “Class 3 Public Primary Certification Authority” that can’t be verified. This opened up a whole new avenue in my investigation.</p>

<p>A popular search engine turned up this <a href="http://curl.haxx.se/mail/archive-2014-10/0062.html">page from the cURL mailing list</a>. Dated from the end of October 2014, it says that two Verisign Class 3 Public Primary Certification Authority certificates were dropped from the cURL CA bundle. It also mentions that, “removing that cert from the ca-bundle breaks [connections to] https://s3.amazonaws.com and https://amazon.com”. That sounded like the very same problem that I was experiencing via Bundler…</p>

<p>Unsurprisingly my next thought was how I could get these certificates back into my CA bundle and successfully verify connections to Amazon. Fortunately this helpful article, entitled <a href="http://kb.kerio.com/product/kerio-connect/server-configuration/ssl-certificates/adding-trusted-root-certificates-to-the-server-1605.html">Adding trusted root certificates to the server</a>, described the process I was after.</p>

<p>Taking the two missing certificates directly from the post on the cURL mailing list and cleaning up the patch markings, I put them both in a file at <code class="language-plaintext highlighter-rouge">/etc/pki/ca-trust/source/anchors/verisign.crt</code>, then ran:</p>

<div class="language-plaintext highlighter-rouge"><div class="highlight"><pre class="highlight"><code>$ sudo update-ca-trust enable
$ sudo update-ca-trust extract
</code></pre></div></div>

<p>Et voilà! We now successfully verify SSL connections to S3: <code class="language-plaintext highlighter-rouge">ruby -r 'net/http' -e "Net::HTTP.get(URI.parse('https://s3.amazonaws.com'))"</code> (that command doesn’t output anything but the important thing is that it doesn’t raise an exception…)</p>

<p>To aid fixing this in the future I’ve put together a shell script to perform all the necessary steps - find it in <a href="https://gist.github.com/grahamlyons/fa36fe35e798e5cf7ae3">this gist</a>. The shell script itself, <a href="https://gist.githubusercontent.com/grahamlyons/fa36fe35e798e5cf7ae3/raw/b86a31375fa9075730386bb7f25bf983e845d0f3/verisign_certs.sh">verisign_certs.sh</a>, can be downloaded and run, as the root user, with <code class="language-plaintext highlighter-rouge">sudo sh ./verisign_certs.sh</code> (if your CA bundle has changed since installing the <code class="language-plaintext highlighter-rouge">ca-certificates</code> RPM then you can add the <code class="language-plaintext highlighter-rouge">--force</code> flag to the script, so long as you’re happy to do so).</p>

<p>(I won’t advise downloading the script with <code class="language-plaintext highlighter-rouge">curl</code> and piping it straight into <code class="language-plaintext highlighter-rouge">sh</code>, lest I end up on <a href="http://curlpipesh.tumblr.com/">http://curlpipesh.tumblr.com/</a>…)</p>]]></content><author><name></name></author><summary type="html"><![CDATA[Whilst building a development virtual machine to distribute to my colleagues I ran into a problem when using the Bundler gem in Ruby. Bundler is a dependency manager and so makes lots of HTTP requests to fetch the necessary Ruby gems and I found that bundle install commands kept failing with an SSL error:]]></summary></entry><entry><title type="html">A Simple In-Memory Cache for Python’s Httplib2</title><link href="/article/a-simple-in-memory-cache-for-python-s-httplib2" rel="alternate" type="text/html" title="A Simple In-Memory Cache for Python’s Httplib2" /><published>2013-07-27T00:00:00+00:00</published><updated>2013-07-27T00:00:00+00:00</updated><id>/article/httplib2-in-memory-cache</id><content type="html" xml:base="/article/a-simple-in-memory-cache-for-python-s-httplib2"><![CDATA[<p>When making HTTP requests programmatically it’s always nice to have a transparent caching mechanism to make things more efficient when you start fetching the same resource thousands of times a second. I was very close to implementing one with Python’s <code class="language-plaintext highlighter-rouge">httplib</code> or <code class="language-plaintext highlighter-rouge">urllib</code> libraries when I came across exactly the functionality I needed in <a href="https://code.google.com/p/httplib2/"><code class="language-plaintext highlighter-rouge">httplib2</code></a>. Huzzah! No need to write (and maintain) anything myself - it’s all taken care of by a robust, widely used library.</p>

<p>The first argument to the <a href="http://httplib2.googlecode.com/hg/doc/html/libhttplib2.html#httplib2.Http"><code class="language-plaintext highlighter-rouge">Http</code> constructor function</a> is the cache, which must be:</p>
<blockquote>
  <p><em>either the name of a directory to be used as a flat file cache, or it must an object that implements the required caching interface</em></p>
</blockquote>

<p>Passing a string as a directory works fine but my instinct is not to use the disk for caching and go for memory whenever possible. Of course that’s not going to persist once the process has died but for long-running processes (like a server) it’ll be more performant (it wasn’t really a worry in my particular instance but it’s always good to think about) and won’t leave any file/directory detritus lying around on the disk. To that end I wondered how tricky it would be to get myself an object implementing the required caching interface…</p>

<p>The documentation for the <a href="http://httplib2.googlecode.com/hg/doc/html/libhttplib2.html#cache-objects">cache objects</a> illustrates a pretty minimal interface, requiring only <code class="language-plaintext highlighter-rouge">get</code>, <code class="language-plaintext highlighter-rouge">set</code> and <code class="language-plaintext highlighter-rouge">delete</code> methods. All of these operations are provided on the built-in dictionary object (the <code class="language-plaintext highlighter-rouge">dict</code> type) in Python so extending or wrapping that object would hopefully give us a really simple cache object in very few lines of code.</p>

<p>I chose to extend the <code class="language-plaintext highlighter-rouge">dict</code> type and it’s necessary to do that because although the type provides get, set and delete operations it doesn’t expose them via quite that interface. The <code class="language-plaintext highlighter-rouge">get</code> method is available, returning <code class="language-plaintext highlighter-rouge">None</code> if the key doesn’t exist, but to set a value against a key in a dictionary you need to use the square bracket syntax:</p>

<div class="language-plaintext highlighter-rouge"><div class="highlight"><pre class="highlight"><code>my_dict = {}
my_dict['key'] = 'Value'
</code></pre></div></div>

<p>Similarly, deletion is achieved via the <code class="language-plaintext highlighter-rouge">del</code> keyword:</p>

<div class="language-plaintext highlighter-rouge"><div class="highlight"><pre class="highlight"><code>del my_dict['key']
</code></pre></div></div>

<p>Fortunately, both of these operations make calls to magic methods under the hood so providing the necessary api is as easy as:</p>

<div class="language-plaintext highlighter-rouge"><div class="highlight"><pre class="highlight"><code>class Cache(dict):

    def set(self, key, value):
        self.__setitem__(key, value)

    def delete(self, key):
        self.__delitem__(key)
</code></pre></div></div>

<p>Super simple - and construction an object to make HTTP requests and cache them in-memory with <code class="language-plaintext highlighter-rouge">httplib2</code> just looks like:</p>

<div class="language-plaintext highlighter-rouge"><div class="highlight"><pre class="highlight"><code>http_client = httplib2.Http(Cache())
</code></pre></div></div>

<p>Or so I thought…</p>

<p>Testing the api for the <code class="language-plaintext highlighter-rouge">Cache</code> object worked exactly as expected: keys got set, values got got and values got deleted. The problem was that the cacheable endpoints that I was testing against kept getting hit when the client should have been getting them from the cache that I’d lovingly crafted for it. What was going wrong?</p>

<p>I tracked the problem down to this line in the <code class="language-plaintext highlighter-rouge">request</code> method on the <code class="language-plaintext highlighter-rouge">Http</code> object in <code class="language-plaintext highlighter-rouge">httplib2</code>:</p>

<div class="language-plaintext highlighter-rouge"><div class="highlight"><pre class="highlight"><code>...
if self.cache:
...
</code></pre></div></div>

<p>Of course, the client will only attempt to fetch from or store in the cache if there is one there to use - very sensible. However, I’d extended the <code class="language-plaintext highlighter-rouge">dict</code> type and being that no requests had been made it was empty and an empty dictionary evaluates to <code class="language-plaintext highlighter-rouge">False</code> in those situations - running <code class="language-plaintext highlighter-rouge">bool({})</code> in the Python REPL illustrates that nicely.</p>

<p>Under the hood, finding the ‘truthiness’ of objects results in another magic method call, this time to <code class="language-plaintext highlighter-rouge">__nonzero__</code>. To make sure the <code class="language-plaintext highlighter-rouge">Http</code> object recognised that there was a cache available to use the <code class="language-plaintext highlighter-rouge">__nonzero__</code> method on my object just needed to return <code class="language-plaintext highlighter-rouge">True</code>:</p>

<div class="language-plaintext highlighter-rouge"><div class="highlight"><pre class="highlight"><code>...
def __nonzero__(self):
    return True
</code></pre></div></div>

<p>With that in place the cache works as expected.</p>]]></content><author><name></name></author><summary type="html"><![CDATA[When making HTTP requests programmatically it’s always nice to have a transparent caching mechanism to make things more efficient when you start fetching the same resource thousands of times a second. I was very close to implementing one with Python’s httplib or urllib libraries when I came across exactly the functionality I needed in httplib2. Huzzah! No need to write (and maintain) anything myself - it’s all taken care of by a robust, widely used library.]]></summary></entry><entry><title type="html">Hello World WAR Using Tomcat and Maven on Ubuntu</title><link href="/article/hello-world-war-using-tomcat-and-maven-on-ubuntu" rel="alternate" type="text/html" title="Hello World WAR Using Tomcat and Maven on Ubuntu" /><published>2013-06-18T00:00:00+00:00</published><updated>2013-06-18T00:00:00+00:00</updated><id>/article/tomcat-maven-hello-world</id><content type="html" xml:base="/article/hello-world-war-using-tomcat-and-maven-on-ubuntu"><![CDATA[<p>Maven is the de facto build tool of Java projects and Tomcat is a very widely used and well-established servlet container. Together they provide an excellent basis for Java projects on the web. To that end I decided to document, from a fresh install of Ubuntu 12.04, the steps required to package and deploy a simple Java webapp, packaged as a WAR, on Tomcat using Maven. At the time of writing the versions used were Tomcat 7 and Maven 3.</p>

<h2 id="installing-the-required-packages">Installing the Required Packages</h2>

<p>First we need to install the tools we’re going to be using, namely Tomcat, Maven and the JDK so that we can compile Java classes. Running this command will get us what we want:</p>

<div class="language-plaintext highlighter-rouge"><div class="highlight"><pre class="highlight"><code>sudo apt-get install maven tomcat7 openjdk-6-jdk -y
</code></pre></div></div>

<h2 id="generate-the-project-structure">Generate the Project Structure</h2>

<p>Maven has an <code class="language-plaintext highlighter-rouge">archetype</code> plugin which can generate the structure of the project for us; we’re after a ‘maven-archetype-webapp’, which will give us the basic structure and files for a Java web project:</p>

<div class="language-plaintext highlighter-rouge"><div class="highlight"><pre class="highlight"><code>mvn archetype:generate -DgroupId=org.example\
 -DartifactId=hello\
 -DarchetypeArtifactId=maven-archetype-webapp\
 -DinteractiveMode=false
</code></pre></div></div>

<p>Run the command above and a directory named ‘hello’ will be created (taken from the <code class="language-plaintext highlighter-rouge">artifactId</code>) containing the appropriate directory structure and the basic files we need. Change into this directory - you can run <code class="language-plaintext highlighter-rouge">tree</code> to see what was created (install it with <code class="language-plaintext highlighter-rouge">sudo apt-get install tree -y</code>):</p>

<div class="language-plaintext highlighter-rouge"><div class="highlight"><pre class="highlight"><code>[user@host hello]# tree
.
|-- pom.xml
`-- src
    `-- main
        |-- resources
        `-- webapp
            |-- WEB-INF
            |   `-- web.xml
            `-- index.jsp

5 directories, 3 files
</code></pre></div></div>

<h2 id="add-a-servlet">Add a Servlet</h2>

<p>Create directory structure for Java classes and create the servlet file:</p>

<div class="language-plaintext highlighter-rouge"><div class="highlight"><pre class="highlight"><code>[user@host hello]# mkdir -p src/main/java/org/example/
[user@host hello]# touch src/main/java/org/example/HelloServlet.java
</code></pre></div></div>

<p>Remove the <code class="language-plaintext highlighter-rouge">index.jsp</code> file because we’re going to use a Servlet instead:</p>

<div class="language-plaintext highlighter-rouge"><div class="highlight"><pre class="highlight"><code>[user@host hello]# rm -f src/main/webapp/index.jsp
</code></pre></div></div>

<p>Add the following content to <code class="language-plaintext highlighter-rouge">HelloServlet.java</code>:</p>

<div class="language-plaintext highlighter-rouge"><div class="highlight"><pre class="highlight"><code>// Reflecting the directory structure where the file lives
package org.example;

import javax.servlet.http.HttpServlet;
import javax.servlet.ServletException;
import javax.servlet.http.HttpServletRequest;
import javax.servlet.http.HttpServletResponse;

import java.io.IOException;
import java.io.PrintWriter;

public class HelloServlet extends HttpServlet {

    protected void doGet(HttpServletRequest request,
                         HttpServletResponse response) throws ServletException, IOException
    {
        // Very simple - just return some plain text
        PrintWriter writer = response.getWriter();
        writer.print("Hello World");
    }
}
</code></pre></div></div>

<p>The code above defines a class which extends the <code class="language-plaintext highlighter-rouge">HttpServlet</code> abstract class and defines a method to run when the server receives a <code class="language-plaintext highlighter-rouge">GET</code> request - the method <code class="language-plaintext highlighter-rouge">doGet</code>. All this method does is print some text in the response.</p>

<p>Add the following content to the <code class="language-plaintext highlighter-rouge">web.xml</code> file, under <code class="language-plaintext highlighter-rouge">src/main/webapp/WEB-INF/</code>:</p>

<div class="language-plaintext highlighter-rouge"><div class="highlight"><pre class="highlight"><code>&lt;?xml version="1.0" encoding="UTF-8"?&gt;
&lt;web-app xmlns="http://java.sun.com/xml/ns/javaee"
  xmlns:xsi="http://www.w3.org/2001/XMLSchema-instance"
  xsi:schemaLocation="http://java.sun.com/xml/ns/javaee http://java.sun.com/xml/ns/javaee/web-app_3_0.xsd"
  version="3.0"&gt; 

    &lt;display-name&gt;Hello World Web Application&lt;/display-name&gt;

    &lt;servlet&gt;
        &lt;servlet-name&gt;HelloServlet&lt;/servlet-name&gt;
        &lt;servlet-class&gt;org.example.HelloServlet&lt;/servlet-class&gt;
    &lt;/servlet&gt;

    &lt;servlet-mapping&gt;
        &lt;servlet-name&gt;HelloServlet&lt;/servlet-name&gt;
        &lt;url-pattern&gt;/&lt;/url-pattern&gt;
    &lt;/servlet-mapping&gt;

&lt;/web-app&gt;
</code></pre></div></div>

<p>The XML config above tells the servlet container - Tomcat, in this case - that requests to the URL <code class="language-plaintext highlighter-rouge">/</code> will be handled by an instance of our servlet class.</p>

<h2 id="building-and-deploying-the-application">Building and Deploying the Application</h2>

<p>We need to tell Maven that our application depends on the classes in the Java servlet API. The servlet api JAR is included in the Tomcat installation so it doesn’t need to be bundled in the WAR file, however it is required for compiling the classes. The following dependency needs to be added to the pom.xml - there should already be a <code class="language-plaintext highlighter-rouge">dependencies</code> tag so add the new <code class="language-plaintext highlighter-rouge">dependency</code> tag inside that:</p>

<div class="language-plaintext highlighter-rouge"><div class="highlight"><pre class="highlight"><code>&lt;dependencies&gt;
    ...
    &lt;dependency&gt;
        &lt;groupId&gt;javax.servlet&lt;/groupId&gt;
        &lt;artifactId&gt;javax.servlet-api&lt;/artifactId&gt;
        &lt;version&gt;3.0.1&lt;/version&gt;
        &lt;scope&gt;provided&lt;/scope&gt;
    &lt;/dependency&gt;
&lt;/dependencies&gt;
</code></pre></div></div>

<p>The <code class="language-plaintext highlighter-rouge">scope</code> tells Maven that it is already provided so doesn’t need to be included.</p>

<p>In the <code class="language-plaintext highlighter-rouge">hello</code> directory in the workspace run the following commands:</p>

<ul>
  <li>
    <p>This compiles the Java classes and puts them into a WAR file.</p>

    <p><code class="language-plaintext highlighter-rouge">mvn package</code></p>
  </li>
  <li>
    <p>This copies the newly created WAR file to the Tomcat webapps folder where it’ll be picked up.</p>

    <p><code class="language-plaintext highlighter-rouge">sudo cp target/hello.war /var/lib/tomcat7/webapps/</code></p>
  </li>
</ul>

<p>In the default install of Tomcat 7 on Ubuntu this is all that’s required to get the servlet container to pick up the WAR and register it as an application. To force the service to restart and pick up any new webapps just run: <code class="language-plaintext highlighter-rouge">sudo service tomcat7 restart</code>. While the service is starting up you can follow the log to check for problems:</p>

<div class="language-plaintext highlighter-rouge"><div class="highlight"><pre class="highlight"><code>tail -f /var/lib/tomcat7/logs/catalina.out
</code></pre></div></div>

<h3 id="getting-a-response">Getting a Response</h3>

<p>Once the server has picked up the WAR without any errors the application can be accessed by hitting the local IP address on the appropriate port and including the webapp (the name of the WAR file) in the URL:</p>

<div class="language-plaintext highlighter-rouge"><div class="highlight"><pre class="highlight"><code>[user@host ~]# curl -D - http://127.0.0.1:8080/hello/
HTTP/1.1 200 OK
Server: Apache-Coyote/1.1
Content-Length: 11
Date: Tue, 18 Jun 2013 07:12:13 GMT

Hello World
</code></pre></div></div>

<p>The port that Tomcat listens on is configured in the <code class="language-plaintext highlighter-rouge">server.xml</code> under the installation directory (/etc/tomcat7/server.xml in this case) and in the default installation in Ubuntu it’s port 8080.</p>

<h3 id="limitations">Limitations</h3>

<p>This servlet doesn’t know about the URL at all so we can hit anything under ‘<code class="language-plaintext highlighter-rouge">/</code>’ and it’ll respond in exactly the same way:</p>

<div class="language-plaintext highlighter-rouge"><div class="highlight"><pre class="highlight"><code>[user@host ~]# curl -D - http://127.0.0.1:8080/hello/what/the/hell/is/this?
HTTP/1.1 200 OK
Server: Apache-Coyote/1.1
Content-Length: 11
Date: Tue, 18 Jun 2013 07:16:35 GMT

Hello World
</code></pre></div></div>]]></content><author><name></name></author><summary type="html"><![CDATA[Maven is the de facto build tool of Java projects and Tomcat is a very widely used and well-established servlet container. Together they provide an excellent basis for Java projects on the web. To that end I decided to document, from a fresh install of Ubuntu 12.04, the steps required to package and deploy a simple Java webapp, packaged as a WAR, on Tomcat using Maven. At the time of writing the versions used were Tomcat 7 and Maven 3.]]></summary></entry><entry><title type="html">How to call a function on each value in a Python dictionary</title><link href="/article/how-to-call-a-function-on-each-value-in-a-python-dictionary" rel="alternate" type="text/html" title="How to call a function on each value in a Python dictionary" /><published>2013-05-21T00:00:00+00:00</published><updated>2013-05-21T00:00:00+00:00</updated><id>/article/call-function-on-each-value-in-python-dictionary</id><content type="html" xml:base="/article/how-to-call-a-function-on-each-value-in-a-python-dictionary"><![CDATA[<p>Python has great support for mapping over lists or tuples, creating new structures containing the results of calling a function on the members of the original. I was looking for something similar for the values in a dictionary, maintaining the original keys, and I didn’t find it described anywhere.</p>

<p>I’d written a little webapp using <a href="http://flask.pocoo.org">Flask</a> and one of the routes took a number of float values in the URL. To make sure that these were indeed the floats I was looking for it seemed prudent to pass them into the <code class="language-plaintext highlighter-rouge">float</code> type and catch any <code class="language-plaintext highlighter-rouge">ValueError</code> that was raised (Flask does have a handler for floats in the routing it inherits from <a href="http://werkzeug.pocoo.org/">Werkzeug</a>, <code class="language-plaintext highlighter-rouge">werkzeug.routing.FloatConverter</code>, but <em>“This converter does not support negative values”</em>). For the first pass at this I listed all the parameters to the function and then checked each one explicitly like this:</p>

<div class="language-plaintext highlighter-rouge"><div class="highlight"><pre class="highlight"><code>@app.route("/route-with-floats/&lt;first&gt;/&lt;second&gt;/&lt;third&gt;/&lt;fourth&gt;")
def route_with_floats(first, second, third, fourth):
    try:
        first = float(first)
        second = float(second)
        third = float(third)
        fourth = float(fourth)
    except ValueError:
        abort(404)
</code></pre></div></div>

<p>That worked fine but I wanted to find a way to condense it down a bit and it occurred that maybe I could use the <code class="language-plaintext highlighter-rouge">**kwargs</code> dictionary; I’d just need to map over that and pass each value into <code class="language-plaintext highlighter-rouge">float</code>. For a <code class="language-plaintext highlighter-rouge">list</code> (or <code class="language-plaintext highlighter-rouge">set</code> or <code class="language-plaintext highlighter-rouge">tuple</code> etc.) the <code class="language-plaintext highlighter-rouge">map</code> function or list comprehensions would be a perfect fit and second nature to Python developers, but I couldn’t recall ever doing anything similar for a <code class="language-plaintext highlighter-rouge">dict</code>.</p>

<p>The solution I came up with passes a <a href="http://docs.python.org/2.7/glossary.html#term-generator-expression">generator expression</a> which iterates over the items in a dictionary (each item is a <code class="language-plaintext highlighter-rouge">tuple</code> of the key and the value) into the <code class="language-plaintext highlighter-rouge">dict</code> callable. For an arbitrary function, <code class="language-plaintext highlighter-rouge">func</code>, and a dictionary, <code class="language-plaintext highlighter-rouge">d</code>, the solution looks like this:</p>

<div class="language-plaintext highlighter-rouge"><div class="highlight"><pre class="highlight"><code>dict((v[0], func(v[1])) for v in d.items())
</code></pre></div></div>

<p>Plugging that into the Flask example above it now looks like this:</p>

<div class="language-plaintext highlighter-rouge"><div class="highlight"><pre class="highlight"><code>@app.route("/route-with-floats/&lt;first&gt;/&lt;second&gt;/&lt;third&gt;/&lt;fourth&gt;")
def route_with_floats(**kwargs):
    try:
        params = dict(
            (v[0], float(v[1])) for v in kwargs.items()
        )
    except ValueError:
        abort(404)
</code></pre></div></div>

<p>Arguably this is less readable and less explicit than the original form but I like the fact that it’ll be the same regardless of the number of parameters i.e. values in the dictionary.</p>

<p>This should actually be described as a <strong>dictionary comprehension</strong>, a feature which is built into Python 3, and in fact the exact technique shown above is described in <a href="http://www.python.org/dev/peps/pep-0274/">PEP 274</a>. It’s good to know that someone cleverer than me has already had the same idea.</p>]]></content><author><name></name></author><summary type="html"><![CDATA[Python has great support for mapping over lists or tuples, creating new structures containing the results of calling a function on the members of the original. I was looking for something similar for the values in a dictionary, maintaining the original keys, and I didn’t find it described anywhere.]]></summary></entry><entry><title type="html">Investigating Local Variable Scope in Python with the ‘dis’ Module</title><link href="/article/investigating-local-variable-scope-in-python-with-the-dis-module" rel="alternate" type="text/html" title="Investigating Local Variable Scope in Python with the ‘dis’ Module" /><published>2013-05-02T00:00:00+00:00</published><updated>2013-05-02T00:00:00+00:00</updated><id>/article/dis-local-scope-python</id><content type="html" xml:base="/article/investigating-local-variable-scope-in-python-with-the-dis-module"><![CDATA[<p>Compared to something like Javascript, scoping in Python is pretty easy to follow. However, I found a situation recently which was confusing at first glance until I examined the Python byte code using the <code class="language-plaintext highlighter-rouge">dis</code> module (<em>“dis - Disassembler of Python byte code into mnemonics”</em>, from the help documentation).</p>

<p>The situation was as follows: the set up of a test class was redefining a class to a mock value, but preserving the original class to be restored later. What happened was that an <code class="language-plaintext highlighter-rouge">UnboundLocalError</code> was thrown, but only when a line <em>below</em> it (quite a long way below it, which was tricky to spot at first) was present. It looked something like this stripped-down example:</p>

<div class="language-plaintext highlighter-rouge"><div class="highlight"><pre class="highlight"><code>class RealClass(object): pass

class Dummy(object): pass

class Test(object):

    def test(self):
        d = RealClass
        RealClass = Dummy
    

if __name__ == "__main__":
    t = Test()
    t.test()
</code></pre></div></div>

<p>Putting that whole lot in a file and running it gives:</p>

<div class="language-plaintext highlighter-rouge"><div class="highlight"><pre class="highlight"><code>$ python scope.py
Traceback (most recent call last):
  File "scope.py", line 15, in &lt;module&gt;
    t.test()
  File "scope.py", line 9, in test
    d = RealClass
UnboundLocalError: local variable 'RealClass' referenced before assignment
</code></pre></div></div>

<p>Ordinarily a <em>“local variable ‘x’ referenced before assignment”</em> error would be fairly trivial but what was confusing was that the behaviour changed when the line <code class="language-plaintext highlighter-rouge">RealClass = Dummy</code> was removed - the line <em>after</em> where the error was thrown. To see what was going on I used the <code class="language-plaintext highlighter-rouge">dis</code> function from the <code class="language-plaintext highlighter-rouge">dis</code> module to see what instructions were being run on the Python VM.</p>

<p>The first look was at the piece of code which didn’t throw an error e.g.:</p>

<div class="language-plaintext highlighter-rouge"><div class="highlight"><pre class="highlight"><code>...
def test(self):
    d = RealClass

...
</code></pre></div></div>

<p>Fire up a Python shell, import the required code (the example code above is in a file called <code class="language-plaintext highlighter-rouge">scope.py</code> in the local directory) and run the <code class="language-plaintext highlighter-rouge">dis</code> function on the <code class="language-plaintext highlighter-rouge">test</code> method on the <code class="language-plaintext highlighter-rouge">Test</code> object:</p>

<div class="language-plaintext highlighter-rouge"><div class="highlight"><pre class="highlight"><code>&gt;&gt;&gt; from scope import *
&gt;&gt;&gt; from dis import dis
&gt;&gt;&gt; dis(Test.test)
  9           0 LOAD_GLOBAL              0 (RealClass)
              3 STORE_FAST               1 (d)
              6 LOAD_CONST               0 (None)
              9 RETURN_VALUE        
&gt;&gt;&gt; 
</code></pre></div></div>

<p>From this we can see that a global variable (<code class="language-plaintext highlighter-rouge">RealClass</code>) is being loaded and stored against the local variable <code class="language-plaintext highlighter-rouge">d</code> (then <code class="language-plaintext highlighter-rouge">None</code> is loaded and returned by the function, but that’s an aside to this).</p>

<p>Restoring the line “<code class="language-plaintext highlighter-rouge">RealClass = Dummy</code>” and re-running this process shows the following output from <code class="language-plaintext highlighter-rouge">dis</code>:</p>

<div class="language-plaintext highlighter-rouge"><div class="highlight"><pre class="highlight"><code>  9           0 LOAD_FAST                1 (RealClass)
              3 STORE_FAST               2 (d)

 10           6 LOAD_GLOBAL              0 (Dummy)
              9 STORE_FAST               1 (RealClass)
             12 LOAD_CONST               0 (None)
             15 RETURN_VALUE
</code></pre></div></div>

<p>So this shows that, rather than being loaded from the global scope (<code class="language-plaintext highlighter-rouge">LOAD_GLOBAL</code>), <code class="language-plaintext highlighter-rouge">RealClass</code> is being loaded locally (<code class="language-plaintext highlighter-rouge">LOAD_FAST</code>) and of course it can’t be found. The line below it loads the <code class="language-plaintext highlighter-rouge">Dummy</code> variable from the global scope and stores it against a local variable, <code class="language-plaintext highlighter-rouge">RealClass</code>; it’s this which has affected the instruction above it.</p>

<p>Assigning to a variable anywhere within a particular scope means that the instruction to the Python VM anywhere else in the same scope is to load it from there. This can be confusing when the use of the variable and the assignment are quite far away from one another.</p>]]></content><author><name></name></author><summary type="html"><![CDATA[Compared to something like Javascript, scoping in Python is pretty easy to follow. However, I found a situation recently which was confusing at first glance until I examined the Python byte code using the dis module (“dis - Disassembler of Python byte code into mnemonics”, from the help documentation).]]></summary></entry></feed>